<?xml version="1.0" encoding="utf-8"?>
<feed xmlns="http://www.w3.org/2005/Atom">
    <id>https://stevenklambert.com/</id>
    <title>Writing | Steven Lambert</title>
    <updated>2026-01-30T18:21:50.707Z</updated>
    <generator>https://github.com/jpmonette/feed</generator>
    <author>
        <name>Steven Lambert</name>
        <email>steven@sklambert.com</email>
    </author>
    <link rel="alternate" href="https://stevenklambert.com/"/>
    <entry>
        <title type="html"><![CDATA[The Encroaching Darkness Postmortem]]></title>
        <id>https://stevenklambert.com/writing/encroaching-darkness-postmortem/</id>
        <link href="https://stevenklambert.com/writing/encroaching-darkness-postmortem/">
        </link>
        <updated>2024-09-26T00:00:00.000Z</updated>
        <summary type="html"><![CDATA[How I came up with, designed, and executed on the idea to create a flip and write style game for the 2024 Js13kgames.]]></summary>
        <content type="html"><![CDATA[<p>Last month I participated in the <a href="https://js13kgames.com">Js13kGames competition</a>. The premise of the competition is to create a game in one month that is no larger than 13KB (zipped). I&#39;ve participated many times in the past and this makes my 6th entry to the yearly competition.</p>
<p>Now that the competition has finished, I wanted to take some time to discuss how I came up with the concept of my <a href="https://boardgamegeek.com/boardgamefamily/66143/mechanism-flip-and-write">flip and write</a> style game <a href="https://js13kgames.com/2024/games/the-encroaching-darkness">The Encroaching Darkness</a>, how I designed it, the problems I had to solve, and how I executed the idea. </p>
<p>But first, if you haven&#39;t played the game yet you should head over to the competition site and play it a few times. It&#39;s free to play in the browser and only takes a few minutes. I&#39;ll wait.</p>
<p>Finished? Great! Let&#39;s begin.</p>

<h2><a name="how-i-came-up-with-the-concept" class="heading-link" href="#how-i-came-up-with-the-concept">How I Came Up With The Concept</a></h2>
<p>This years theme for the competition was <a href="https://en.wikipedia.org/wiki/Triskaidekaphobia">Triskaidekaphobia</a>, the fear of the number 13. This was the 13th year of the competition so it was a very fitting theme. </p>
<p>As I thought about what game I could make that would incorporate the theme and how limited my time would be this year to participate, I decided I wanted to try making a small game that could easily be a board game. I decided that I wanted to try to make a city building style game as well. I seem to be enjoying those lately since I made <a href="https://straker.itch.io/osteopolis">Osteopolis</a> for last years competition.</p>
<p>I started by looking at other games that I enjoy that would be similar to the style I wanted to make. I looked at <a href="https://boardgamegeek.com/boardgame/199792/everdell">Everdell</a>, <a href="https://boardgamegeek.com/boardgame/8217/san-juan">San Juan</a>, <a href="https://boardgamegeek.com/boardgame/37380/roll-through-the-ages-the-bronze-age">Roll Through the Ages</a>, <a href="https://boardgamegeek.com/boardgame/270971/era-medieval-age">Era: Medieval Age</a>, <a href="https://store.steampowered.com/app/1336490/Against_the_Storm/">Against the Storm</a>, <a href="https://store.steampowered.com/app/323190/Frostpunk/">Frostpunk</a>, <a href="https://store.steampowered.com/app/1046030/ISLANDERS/">ISLANDERS</a>, <a href="https://store.steampowered.com/app/690830/Foundation/">Foundation</a>, and <a href="https://dr-d-king.itch.io/tiny-islands">Tiny Islands</a>. </p>
<p>I made a list of the things I liked about the games and could maybe incorporate into my own game. I&#39;ve always wanted to make a game that was like Tiny Islands in both scope and size, so I thought I would start with a game about placing buildings on a grid. </p>
<p>From city builders like Foundation and Frostpunk I looked at how people had needs that you had to meet. From Against the Storm I looked at how it played with buildings being randomly given to the player. From Era: Medieval Age and Roll Through the Ages I looked at the disasters and gaining resources through dice rolls. </p>
<p>From San Juan I looked at how the cards were both buildings and the resources needed to build them. Lastly from ISLANDERS and Tiny Islands I looked at building placement requirements and scoring based on surrounding buildings and features.</p>
<p>With all these things I came up with an initial idea of making a survival style city building (another style of game I like since I made <a href="https://straker.itch.io/ravaged-space">Ravaged Space</a> for the Australian Bushfire Charity Jam). I wanted a game that had the same type of constant threat mechanic like Frostpunk and its cold. Something that started as a minor threat, but not too difficult to manage, but that would quickly escalate into a serious problem that you had to plan how to deal with.</p>
<p>I decided to incorporate the fear part of the theme and thought about how fear can be overwhelming. This lead to the idea to use darkness as the mechanic and that it would spread or grow over time to start swallowing up the tiles on the board. </p>

<h2><a name="designing-the-game" class="heading-link" href="#designing-the-game">Designing the Game</a></h2>
<p>With the main threat mechanic and style of game decided on, I next wanted to come up with how the game would be played. My first idea was that you would place houses on the board and each house would have needs, like food and water. You would then need to place down other buildings that satisfied these needs. </p>
<p>I also wanted a sort of resource mechanic that wasn&#39;t number based. After all any number that counted up would eventually reach 13, which I wanted to avoid due to the theme. Games like Era: Medieval Age restrict how many of a resource you can have, but I didn&#39;t want to track resources as that would add more noise to the game than I wanted.</p>
<p>I decided to try an idea where certain buildings were unavailable until you had built another building first. For example you couldn&#39;t build a building that required wood without first building the building that produced the wood. That lead to the lumber mill and stone mason buildings to unlock wood and stone buildings.</p>
<p>I wanted to have the buildings that come up be random, similar to Tiny Islands and Against the Storm. I came up with the idea to incorporate the number 13 part of the theme by assigning each building a value, and if the total value of the drawn cards was 13 or more then that would be how the darkness would spread. </p>
<p>I also wanted some sort of <a href="https://boardgamegeek.com/boardgamemechanic/2661/push-your-luck">push your luck</a> mechanic so decided that the number of houses would dictate how many buildings would be dealt each round. By building more houses to score more points, you also increased the chance of spreading the darkness.</p>
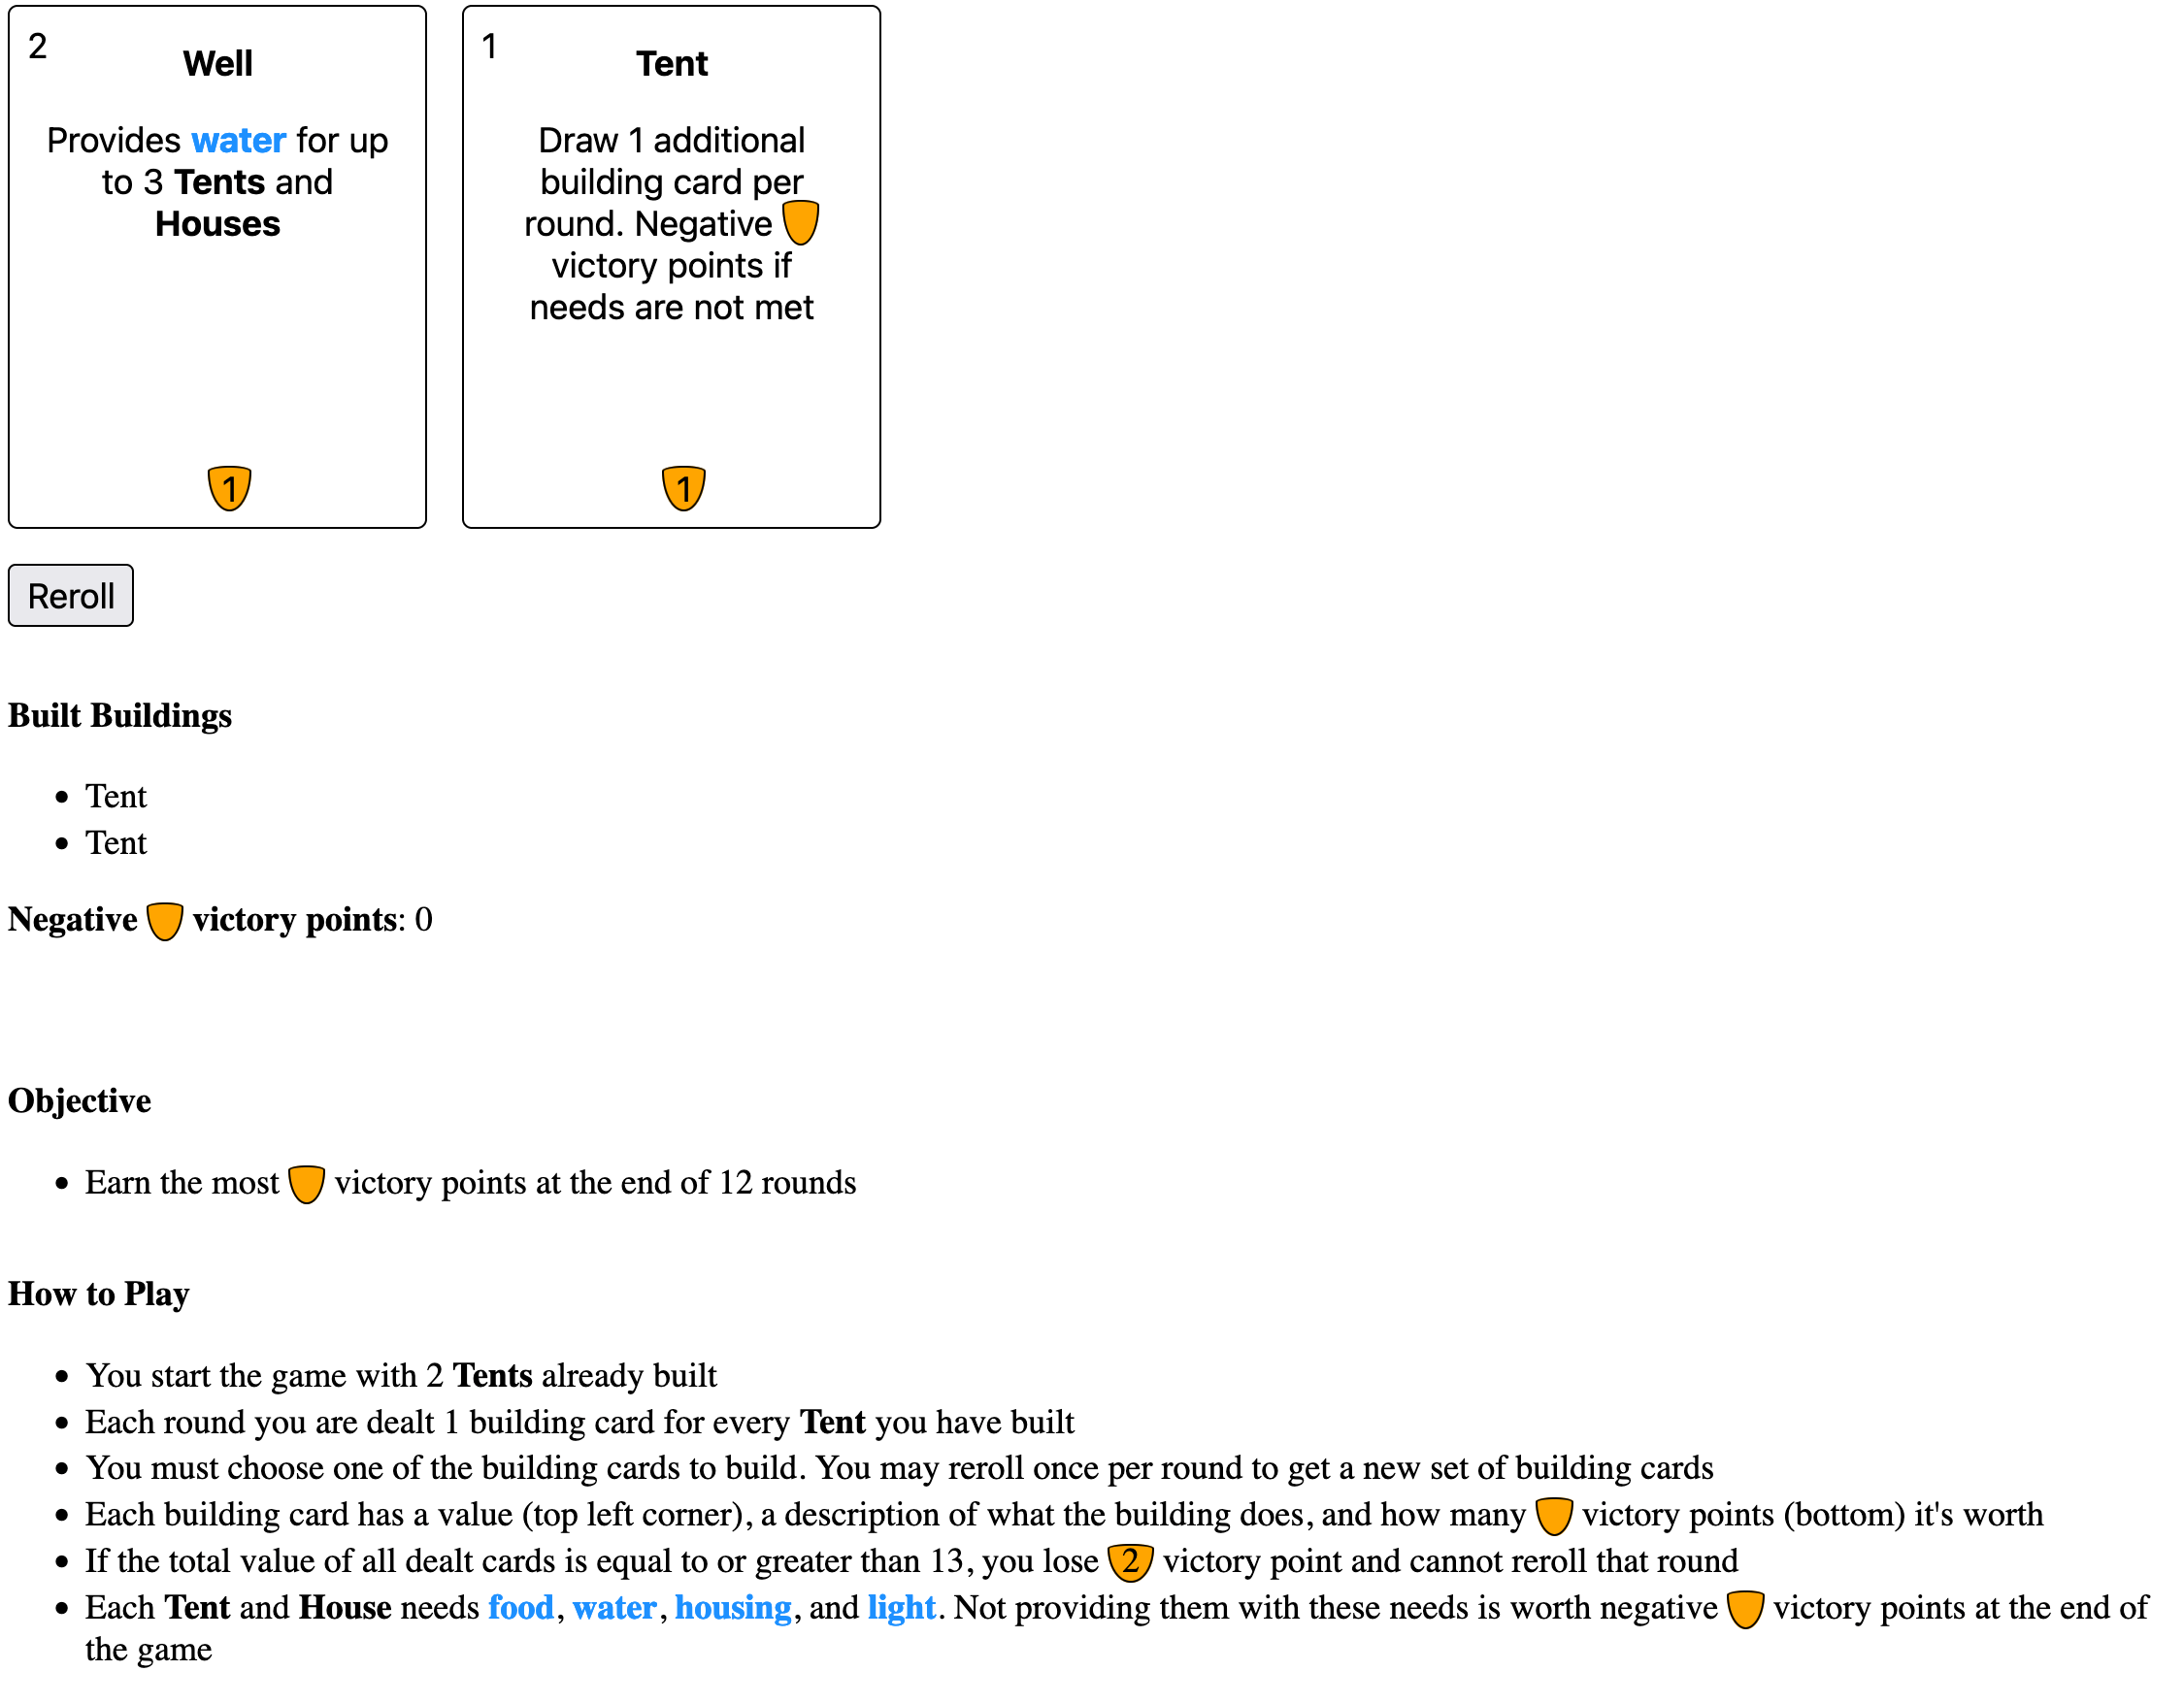
<p>That was enough of the game to start paper prototyping. I played a few games on paper and the concept was interesting. I had someone else try it out as well, and then coded up a quick prototype that I shared with the Js13k community. For the prototype I simplified everything down to just what I wanted to test, which was drawing cards and what happens when you draw over 13 in value.</p>
<figure>
  <a href="/images/encroaching-darkness-first-prototype.png">
    <img loading="lazy" src="/images/encroaching-darkness-first-prototype.png" alt="Two cards are shown, a Well and a Tent, and a Reroll button is below them. The games objective, rules, and scoring are listed" width="1321" height="722">
  </a>
  <figcaption>The first prototype of the game. Since I wanted others to play it without me explaining it I wrote the rules and scoring on the page. Click for larger image</figcaption>
</figure>

<p>Those who played the prototype thought the concept was interesting, so I moved forward with the idea and started fleshing out the game more. </p>
<p>I worked on making buildings score via adjacency to other buildings, and made buildings only satisfy the needs of houses based on being adjacent. I worked on what buildings to have and came up with a list of 8 I thought might work and how they would score. </p>
<ul>
<li>Houses would gain you lots of points but also have needs of water, food, and light. Not satisfying these needs would lose you points</li>
<li>Wells would provide water but only to adjacent houses</li>
<li>Farms would provide food to any house on the map, but only up to 2 houses per farm</li>
<li>Lumber mills would allow you to build buildings that required wood</li>
<li>Stone masons would allow you to build buildings that required stone</li>
<li>Churches required a lumber mill before they&#39;re available and would help mitigate the problem of drawing too many cards by reducing the total value the cards by 3</li>
<li>Builder Huts required a lumber mill before they&#39;re available and would let you build a 2nd building each round</li>
<li>Light Towers required a stone mason before they&#39;re available and would provide light to any nearby houses. They would also push back the darkness, preventing it from spreading into adjacent tiles. Light towers are there to help mitigate the darkness spreading where you don&#39;t want it to</li>
</ul>
<p>I had other ideas for buildings that could be used, such as walls, but decided they made the game more complex than I wanted.</p>
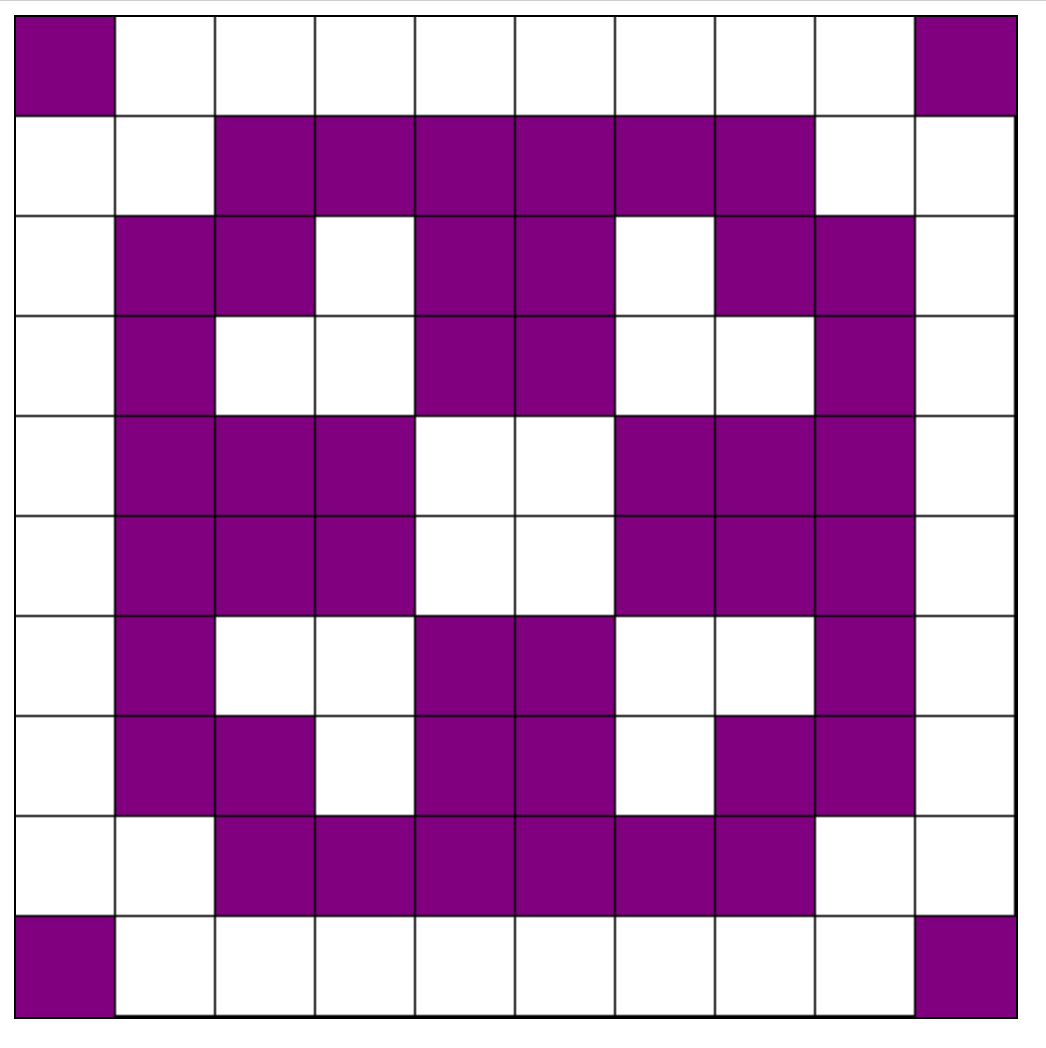
<p>I also worked on figuring out the size of board I wanted the game to play on and how the darkness would start on the board and spread. I started with a 10x10 board (for no particular reason) and tried to think about how to randomly place the darkness. I thought it would be interesting if the darkness could start on any tile that was a multiple of 13, in any direction of row and column. Then I would pick 13 of them at random for the starting placement.</p>
<figure>
  <a href="/images/encroaching-darkness-grid.png">
    <img loading="lazy" src="/images/encroaching-darkness-grid.png" alt="A 10x10 grid with what almost is a 4 leaf clover pattern of darkness squares filled in" width="1321" height="722">
  </a>
  <figcaption>An example of a 10x10 grid with every 13th square filled with darkness. Click for larger image</figcaption>
</figure>

<p>When the darkness spread the game would choose a random darkness tile and have it spread into one of its adjacent tiles. </p>
<p>I did a lot more paper prototyping with others, trying to figure out how to score buildings that felt good. I initially had a lot of the buildings give both positive and negative points depending on placement, similar to ISLANDERS. I went through many iterations of changing the scoring. I eventually decided to remove all of the negative point scoring as it made things too complicated.</p>
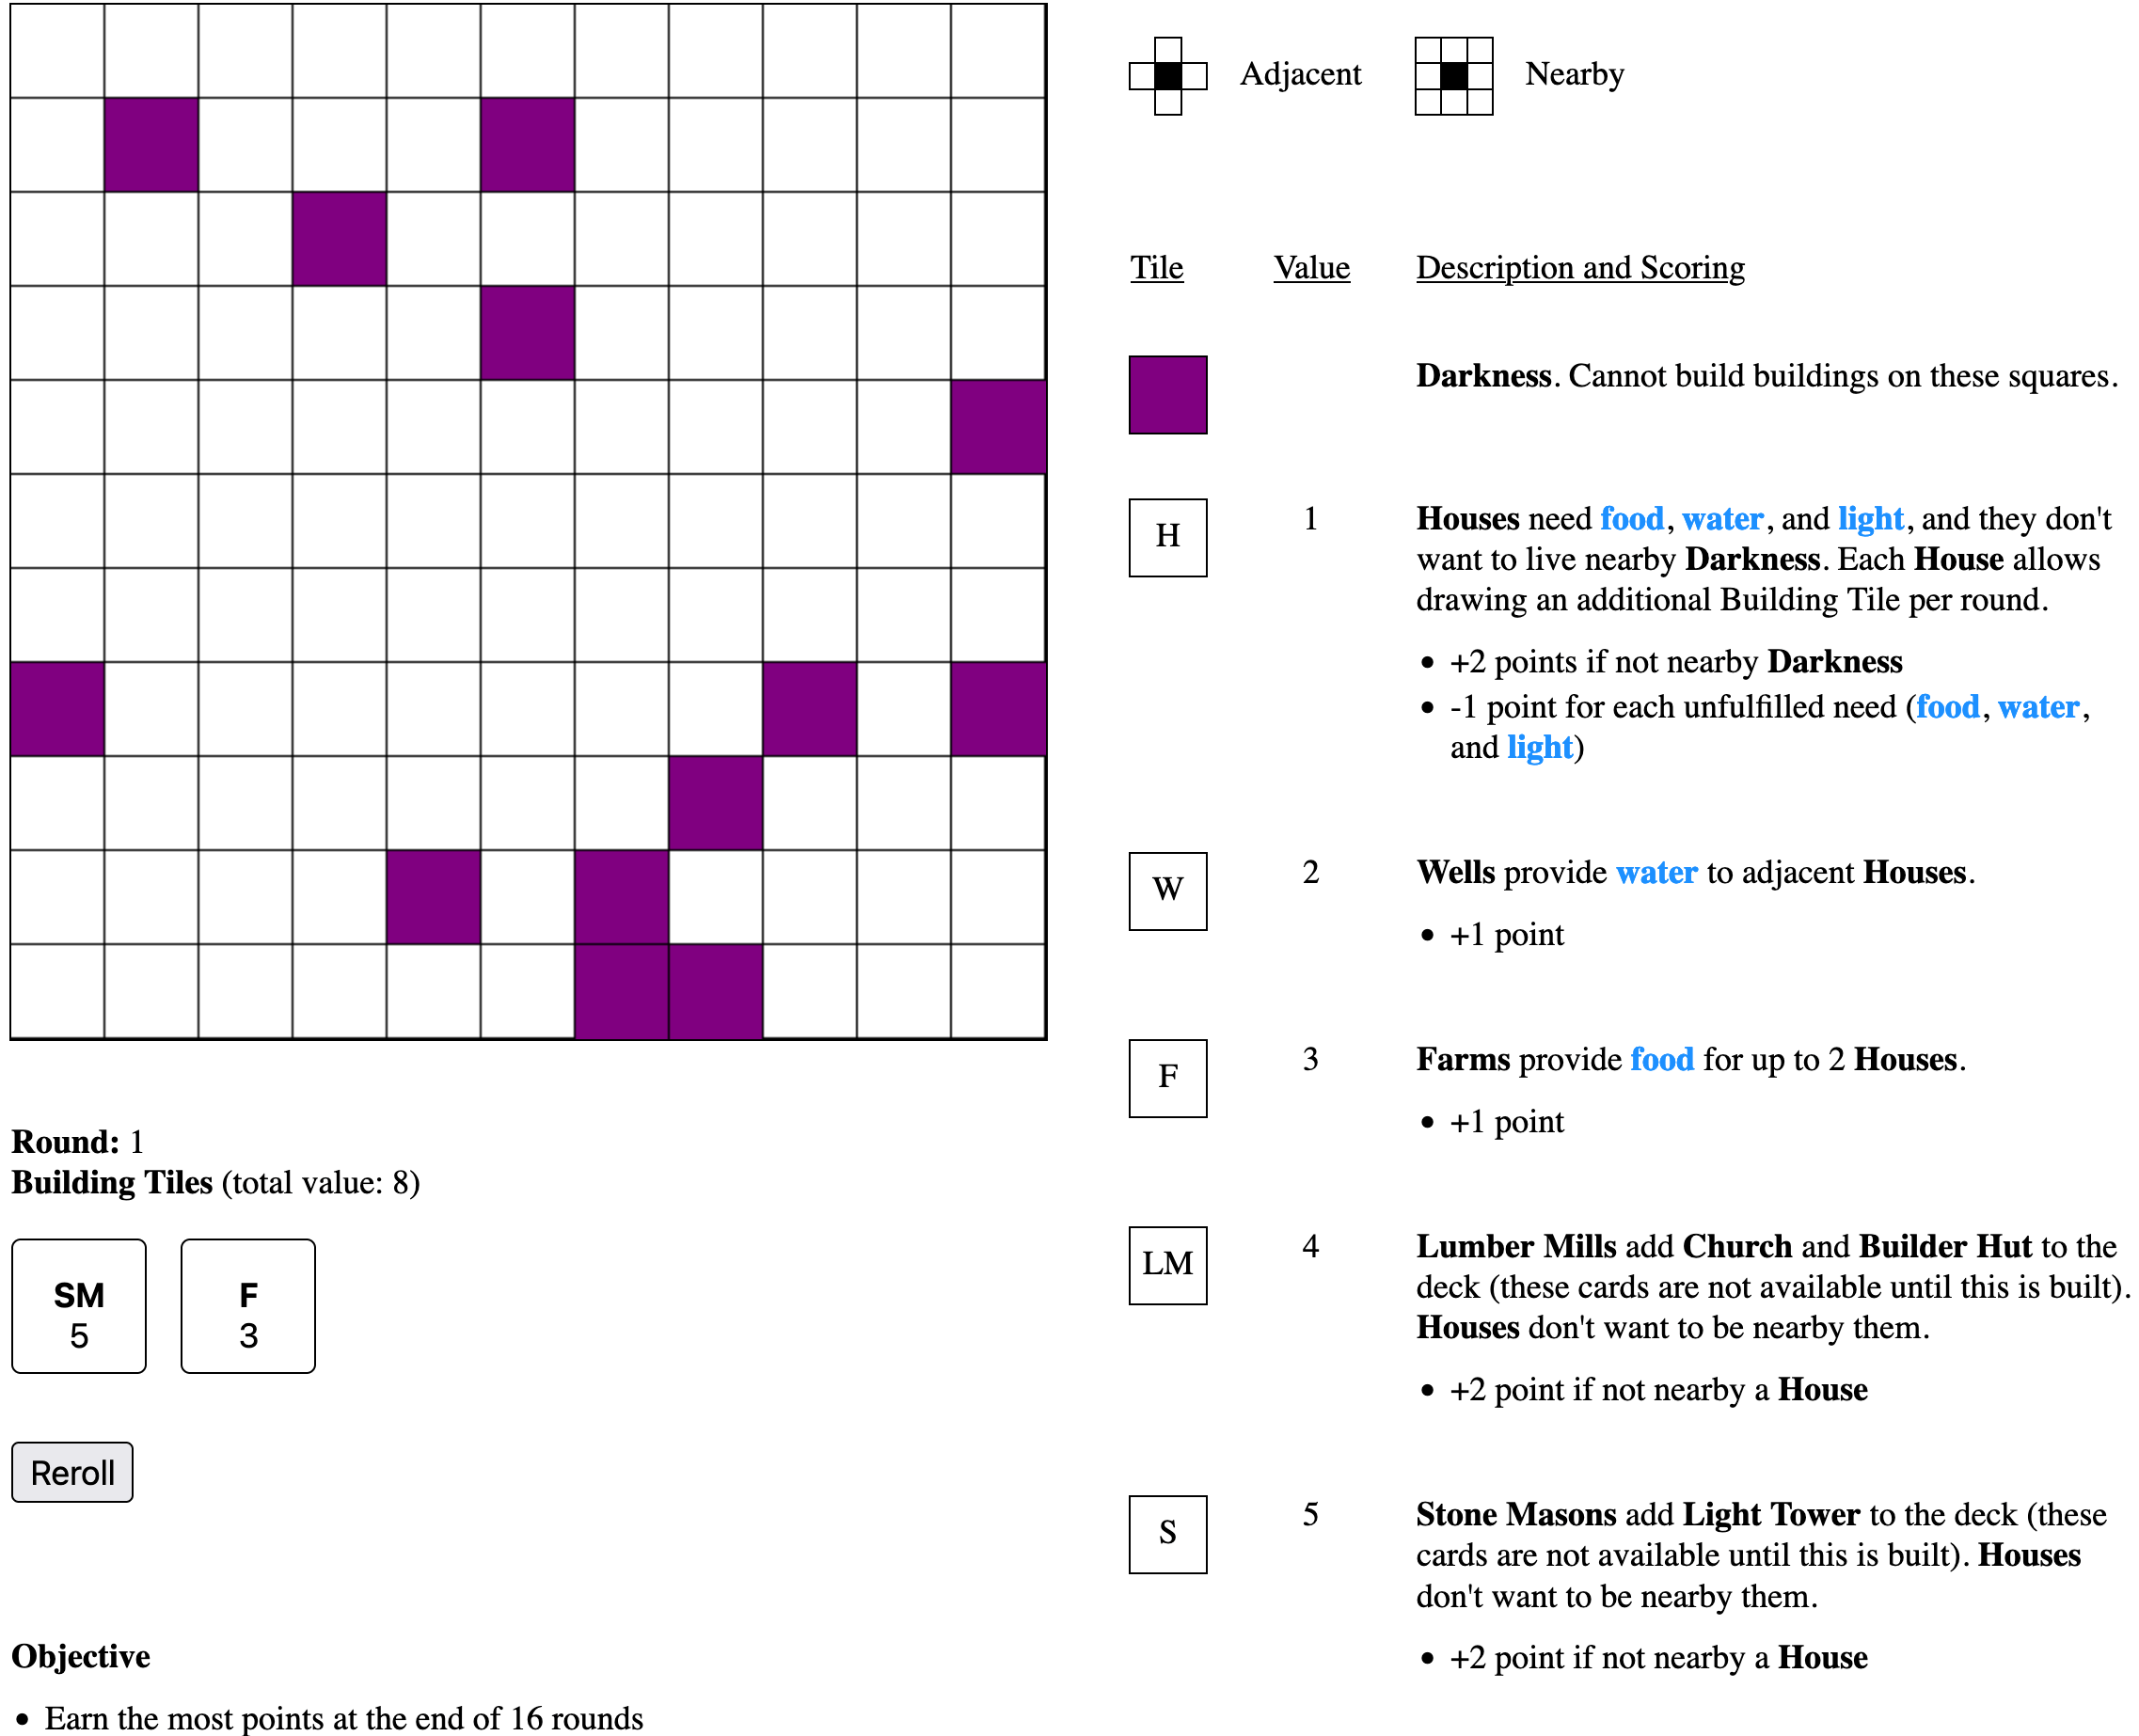
<p>I also decided that a 10x10 board was too small to fit everything, especially if you wanted to place buildings a few tiles away from the darkness. So I increased the board size to 11x11 to give more breathing room.</p>
<p>After paper prototyping a bunch, I updated the online version and sent out another round of prototyping to the community.</p>
<figure>
  <a href="/images/encroaching-darkness-prototype-2.png">
    <img loading="lazy" src="/images/encroaching-darkness-prototype-2.png" alt="An 11x11 grid is displayed in the left corner and below it 2 building cards are shown, a Stone mason and Farm. The games objective and rules are below the building cards, and a list of all buildings and how they score are displayed on the right column." width="1321" height="722">
  </a>
  <figcaption>The second online prototype of the game with a playable 11x11 grid. Click for larger image</figcaption>
</figure>


<h2><a name="finding-the-fun" class="heading-link" href="#finding-the-fun">Finding the Fun</a></h2>
<p>It was during this time that I was feeling that the game wasn&#39;t fun to play. There were a few things that contributed to that feeling. </p>
<p>The first was that it was too easy to play conservatively and never draw more than 2 cards the entire game. This would almost guarantee that you would never draw more than 13 total value so the darkness would never spread. I wanted the darkness to be a constant threat so I didn&#39;t want the players to feel like it was more of an inconvenience. </p>
<p>The second was that the way buildings worked and scored wasn&#39;t working. The lumber mill and stone mason were no longer needed after you built them once, so when they showed up again it felt like a wasted draw. </p>
<p>Houses were also problematic. Since they would increase how many cards you would draw per round no one wanted to build more of them since it would increase the chance for the darkness to spread.</p>
<p>The third and more major problem was that it wasn&#39;t interesting to place the buildings. You could always place your buildings in an optimal way and the way buildings scored wasn&#39;t in and of itself providing enough strategy and fun. </p>
<p>With a few weeks left of the competition I needed to figure these things out.</p>

<h3><a name="making-the-darkness-more-threatening" class="heading-link" href="#making-the-darkness-more-threatening">Making the Darkness more Threatening</a></h3>
<p>The first thing I decided to tackle was the darkness. I tried a few different approaches to make the darkness more threatening. </p>
<p>Since the darkness was spreading too slowly I decided to spread it multiple times every time the total value of the cards was 13 or more. That didn&#39;t work as it caused the darkness to get out of hand really quickly. </p>
<p>I next tried making the darkness spread to every adjacent tile instead of just 1. This made it spread too quickly when combined with spreading multiple times, so I reverted to just spreading it once every time.</p>
<p>That fixed the problem with how the darkness spread, but it still didn&#39;t address the problem of players playing conservatively. I decided to try having the darkness spread at the end of every round. Having a negative effect happen at the end of every turn is a popular mechanic in coop style board games such as <a href="https://boardgamegeek.com/boardgame/30549/pandemic">Pandemic</a> and <a href="https://boardgamegeek.com/boardgame/100901/flash-point-fire-rescue">Flash Point</a>. </p>
<p>Having the darkness spread every turn made all the difference to how threatening the darkness was. Now players had no choice about when it spread and instead had to plan how they wouldn&#39;t spread it further.  </p>
<p>The last thing I did was encourage the darkness to spread as much as it could every time. The problem I was finding was that half way through the game the darkness would merge into a big glob and the majority of darkness tiles would then only have 1 or 2 other tiles it could spread into. </p>
<p>I didn&#39;t like how it felt when the darkness barely spread, so I programmed it to sort the darkness tiles by how many neighboring tiles it could spread into, then biased the random number generator to favor tiles that had the greatest number of spreadable tiles. This helped the darkness feel constantly threatening rather than tapering off near the end game.</p>

<h3><a name="hindering-the-optimal-play" class="heading-link" href="#hindering-the-optimal-play">Hindering the Optimal Play</a></h3>
<p>Next up was figuring out how to stop players from playing optimally every game. In Tiny Islands the tiles have restrictions on where they can be played, restricted to a certain row, column, or area. I didn&#39;t want to copy Tiny Islands mechanic so I tried to think of something I could do.</p>
<p>After a week of pondering on it I had the thought of restricting building placement on the board using their values. This made me think of the game <a href="https://en.wikipedia.org/wiki/Sudoku">Sodoku</a> where you play in a 9x9 grid and each of the numbers 1-9 can only show up in any row, column, or 3x3 group exactly once. </p>
<p>I tried implementing a similar concept to my game where each building could only be placed in any row, column, or 3x3 group exactly once, but it made the game too restrictive in building placement. I looked at other games similar to Sodoku to get more ideas on how to play with numbers, such as <a href="https://en.wikipedia.org/wiki/Kakuro">Kakuro</a> and <a href="https://en.wikipedia.org/wiki/Futoshiki">Futoshiki</a>, but I wasn&#39;t able to come up with anything that worked.</p>
<p>While looking up similar games I stumbled upon <a href="https://commons.wikimedia.org/wiki/File:Tectonic-1_WP.jpg">Jigsaw Sudoku</a>, which uses irregular shapes for the area bounds rather than a 3x3 group. This made me think about having my buildings take up an area rather than just be a 1x1 tile. I immediately thought of using Tetris like pieces for the buildings, and quickly prototyped a version of the game using 3 piece <a href="https://en.wikipedia.org/wiki/Polyomino">tetrominoes</a>. After the first game I knew I had what I wanted.</p>
<p>I also kept the concept of Sokoban row and column rules, but instead of restricting play it instead counted the values of the buildings in the same row and column and if they totaled 13 or more the darkness would spread.</p>

<h3><a name="changing-the-way-buildings-worked" class="heading-link" href="#changing-the-way-buildings-worked">Changing the Way Buildings Worked</a></h3>
<p>To try to fix the buildings, I tried changing how lumber mills and stone masons worked. Instead of automatically unlocking the church and light tower, I decided to make each building have a percent chance of being drawn. The lumber mill and stone mason would then increase the percent chance of the church and light tower. That way you would be incentivized to build them more than once. </p>
<p>However this change didn&#39;t seem to work. Players would try to build stone masons to get light towers, but when light towers didn&#39;t show up the players felt like the mechanic wasn&#39;t working. I tried adjusting the percent increase many times but in the end nothing was working.</p>
<p>I finally decided to just drop the mechanic of locking out the church and light house and instead just made every building equally likely to be drawn. </p>
<p>The farm and well also suffered from the same problem that once you had enough to satisfy all the needs of your houses, you didn&#39;t really want to build more of them. After some time I decided to remove the needs system completely. This meant that houses wouldn&#39;t require needs and buildings wouldn&#39;t satisfy anything.</p>
<p>Lastly the church&#39;s mechanic of reducing the total value of the buildings was too complex so I removed it, and I removed the builder hut as I no longer felt I needed to give players a way to build multiple times per round.</p>

<h3><a name="improving-the-scoring" class="heading-link" href="#improving-the-scoring">Improving the Scoring</a></h3>
<p>With all the changes to buildings and placement, I also needed to fix how the buildings scored.</p>
<p>To improve the scoring I looked at games like <a href="https://boardgamegeek.com/boardgame/263918/cartographers">Cartographers</a>, Era: Medieval Age, and <a href="https://boardgamegeek.com/boardgame/822/carcassonne">Carcassonne</a>. I wanted to make how buildings scored be unique and interesting and not just always have it score based on being adjacent to other things. </p>
<p>One of the first changes I made was to replace the well with a lake since they didn&#39;t need to provide water to houses. I figured lakes are more interesting when they are surrounded by many features, so I decided to score it like the Monastery from Carcassonne where it gain a point for every nearby building or feature. This made the lake a building you wanted to cluster around other things.</p>
<p>For the lumber mill and stone mason I added trees and mountains to the board and chose to make them gain points based on being nearby them (respectively). Unfortunately this made them essentially function the exact same, so I&#39;m not entirely happy with it but I was running out of time at this point so left it as is.</p>
<p>I thought houses would like to be clustered together, so chose to score them based on clusters of adjacent houses. This is similar to how the Forests work in Tiny Islands and Villages in Cartographers. </p>
<p>Farms benefit from being larger (since they can feed more people) so for a different way to score I decided to use the area of the farm shape for the scoring. The more area the farm has the more it scores. This encourages you to place the larger tiles instead of always choosing smaller ones to fit better.</p>
<p>For the church and light tower, again due to lack of time, I just took some scoring concepts from Tiny Islands. Churches should be placed far away from the darkness (similar to boats) and light towers shouldn&#39;t be in the same row or column as another light tower (similar to waves).</p>

<h2><a name="finishing-touches" class="heading-link" href="#finishing-touches">Finishing Touches</a></h2>
<p>With the game now settled I tested it a few times with others and everyone loved it.</p>
<p>With only a few days left before the deadline, it was time to finish the last two missing parts: art and final scoring. Up until this point I never had implemented the final scoring as I was focused on the main game mechanics.</p>
<p>I started by looking for images to use for the buildings. I looked at a few of my favorite sites to grab assets from: <a href="https://opengameart.org">OpenGameArt</a>, <a href="https://www.flaticon.com/">Flaticon</a>, <a href="https://game-icons.net/">Game-icons.net</a>, and <a href="https://www.kenney.nl/">Kenney</a>. I couldn&#39;t find icons in the first 3 sites, but I stumbled upon Kenney&#39;s <a href="https://www.kenney.nl/assets/cartography-pack">Cartographer Pack</a> which was the style I was hoping for and had all the buildings I needed.</p>
<p>I knew that the game would be confusing to understand at first, and that I didn&#39;t have enough time to try to create a tutorial or explain the game any better than my initial prototype UI (which was a mess). I needed a way to make sure that the players understood how buildings scored at least at the end so that they would be encouraged to play again. </p>
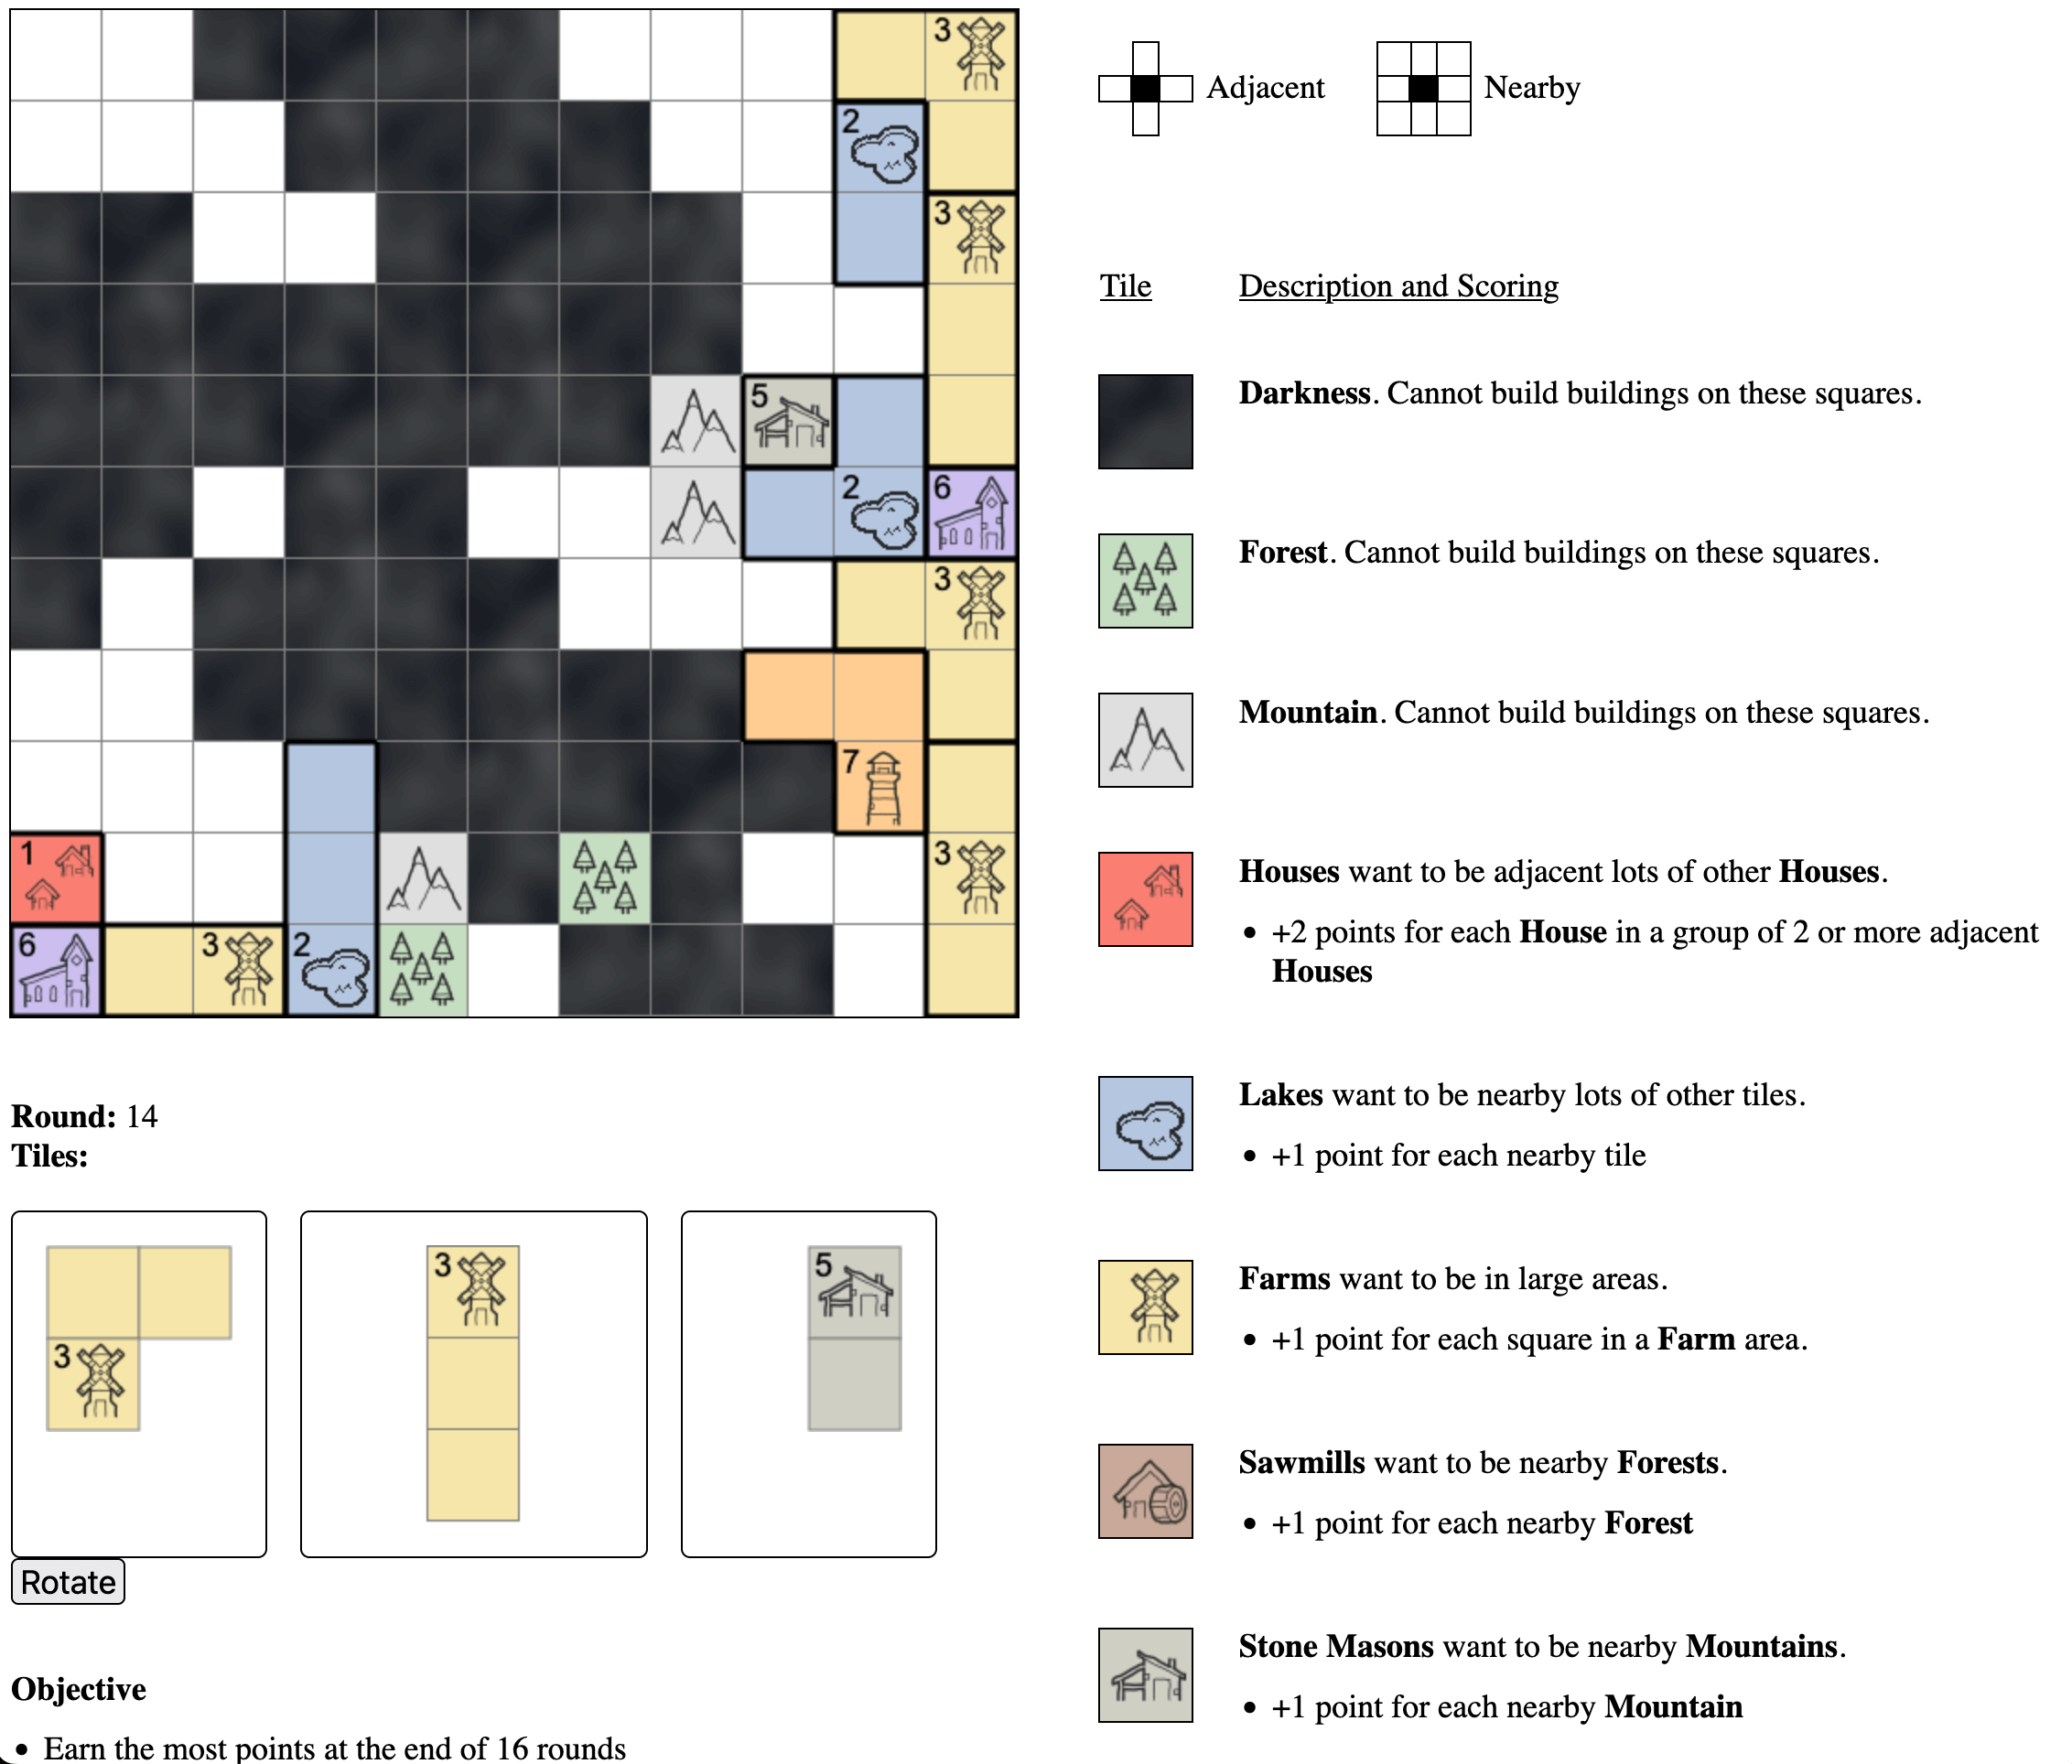
<p>I once again took inspiration from Tiny Islands and used its scoring animation to teach the player how the buildings worked. It worked out really well and I was able to get it working a few hours before the deadline.</p>
<figure>
  <a href="/images/encroaching-darkness-final.png">
    <img loading="lazy" src="/images/encroaching-darkness-final.png" alt="An 11x11 game grid is displayed in the left corner. The squares of the grid are fill with buildings and darkness. Various buildings are clustered around the bottom and left edges of the game while the darkness has filled the middle." width="1321" height="722">
  </a>
  <figcaption>The final version of the game. Click for larger image</figcaption>
</figure>


<h2><a name="game-reception" class="heading-link" href="#game-reception">Game Reception</a></h2>
<p>The game has been really well received during the competition. Players have commented that it&#39;s very replayable and fun. As I suspected the game takes players a few times before it really clicks, but it plays quickly enough that it hopefully hasn&#39;t deterred anyone from playing more than once.</p>
<p>The UI is still a mess since I ran out of time so I probably won&#39;t score very high in that category. But overall I&#39;m extremely pleased with the game and how it turned out.</p>
<p>After the competition I plan to release a post-compo version of the game to itch.io. As always it&#39;ll focus on improving the UI and adding accessibility features. I plan to make it accessible to screen readers so players with limited to no vision can play it. I have an idea of how I&#39;m going to make that work, but it&#39;ll take some testing to figure out how best to inform the player about the shapes of pieces.</p>
]]></content>
    </entry>
    <entry>
        <title type="html"><![CDATA[Getting the Prettier API to Format Code in the Same Way as the CLI]]></title>
        <id>https://stevenklambert.com/writing/getting-prettier-api-format-code-same-as-cli/</id>
        <link href="https://stevenklambert.com/writing/getting-prettier-api-format-code-same-as-cli/">
        </link>
        <updated>2022-11-06T00:00:00.000Z</updated>
        <summary type="html"><![CDATA[Trying to get the Prettier API to format code in the same way as the CLI was proving difficult. I finally figured out the required steps in order to get it to work.]]></summary>
        <content type="html"><![CDATA[<p>For some time now I&#39;ve struggled to get the Prettier Node API to format code in the same way as the CLI does. What I mean by that is when running the Prettier CLI with a Prettier config file, it would format the code as expected. However, when I would try to run the Node API on the same file, it wouldn&#39;t quite format the code in the same way.</p>
<pre tabindex="0"><code class="language-bash"># CLI works as expected
npx prettier --write path_to_file
</code></pre>
<pre tabindex="0"><code class="language-js">// Node API wasn&#39;t formatting correctly
const prettier = require(&#39;prettier&#39;);
prettier.format(code, ...options);
</code></pre>
<p>After a lot of trial and error, I was finally able to figure out the required steps in order to get it to work.</p>
<p>First, using the Node API requires that you pass the <a href="https://prettier.io/docs/en/options.html#parser"><code>parser</code> option</a>. I had always struggled to figure out which parser to use as Prettier doesn&#39;t seem to list the defaults (especially when trying to format JSON). It turns out that if you pass the <a href="https://prettier.io/docs/en/options.html#file-path"><code>filepath</code> option</a>, Prettier will infer the <code>parser</code> option for you. This wasn&#39;t stated clearly enough for me to understand in the docs.</p>
<p>The reason it uses <code>filepath</code> instead of using something like file extension is because the Prettier config file can have <a href="https://prettier.io/docs/en/configuration.html#configuration-overrides">overrides</a> that are triggered based on the filepath.</p>
<pre tabindex="0"><code class="language-js">prettier.format(code, {
  filepath: &#39;path_to_file&#39;
});
</code></pre>
<p>The next thing I had to do was figure out how to import the Prettier config. I would have assumed the <code>format</code> function would load it automatically, but that was not the case. Instead we have to load it ourselves and pass it as options into the function using the <a href="https://prettier.io/docs/en/api.html#prettierresolveconfigfilepath--options"><code>resolveConfig</code> function</a>.</p>
<pre tabindex="0"><code class="language-js">const filepath = &#39;path_to_file&#39;;
const config = prettier.resolveConfig.sync(filepath);
prettier.format(code, {
  filepath,
  ...config
});
</code></pre>
<p>Lastly, in order to correctly format JSON you have to stringify it first. Not only that, but you also might need to use the <a href="https://developer.mozilla.org/en-US/docs/Web/JavaScript/Reference/Global_Objects/JSON/stringify#parameters"><code>space</code> option</a> when you stringify in order for Prettier to output newlines correctly. Otherwise Prettier will try to put object properties on a single line if they don&#39;t exceed the line width setting.</p>
<pre tabindex="0"><code class="language-js">const filepath = &#39;path_to_file&#39;;
const config = prettier.resolveConfig.sync(filepath);
const code = JSON.stringify(data, null, 2);
prettier.format(code, {
  filepath,
  ...config
});
</code></pre>
<p>With that, I was able to get the API and the CLI to be consistent in how the code was formatted.</p>
]]></content>
    </entry>
    <entry>
        <title type="html"><![CDATA[Bash Output Verbose Logs While Still Capturing Output]]></title>
        <id>https://stevenklambert.com/writing/bash-output-verbose-logs-while-still-capturing-output/</id>
        <link href="https://stevenklambert.com/writing/bash-output-verbose-logs-while-still-capturing-output/">
        </link>
        <updated>2022-01-25T00:00:00.000Z</updated>
        <summary type="html"><![CDATA[A technique for outputing verbose logs from a function without adding them to the captured output.]]></summary>
        <content type="html"><![CDATA[<p>I was recently working in Bash (a language I&#39;m familiar with but don&#39;t develop in often) and I needed to capture the output of bash command and save it to a variable. The standard way to do this is to use the <code>$()</code> syntax to run the command in a subshell and return the value.</p>
<p>So for example, if we wanted to run the function <code>add</code> and capture the output to the variable <code>value</code>, we would write:</p>
<pre tabindex="0"><code class="language-bash">function add() {
  echo $(($1 + $2))
}

value=$(add 5 3)
echo $value  # 8
</code></pre>
<p>This worked great until I wanted to add verbose log output to the function I was calling. This proved a difficult challenge since adding additional output would be saved to the variable, which is not what I wanted.</p>
<pre tabindex="0"><code class="language-bash">verbose=1

function add() {
  result=$(($1 + $2))
  if [[ &quot;$verbose&quot; -eq 1 ]]; then
    echo &quot;adding $1 and $2 for a result of $result&quot;
  fi

  echo $result
}

value=$(add 5 3)
echo $value  # adding 5 and 3 for a result of 8 8
</code></pre>
<p>I tried a lot of different ideas on how to solve the problem, from taking the last line of the output to using the <a href="https://phoenixnap.com/kb/linux-tee">tee command</a>. Everything I tried never really worked the way I wanted. Either the logs would display everything (including the last line which wasn&#39;t necessary) or output in the wrong order (especially with error messages sending to stderr).</p>
<p>Eventually I stumbled upon this <a href="https://stackoverflow.com/questions/64530573/in-bash-how-to-capture-some-output-in-variable-letting-rest-got-to-standard-ou">stackoverflow question</a> which let me do exactly what I wanted.</p>
<p>The solution is use a <a href="https://www.linux.com/training-tutorials/ampersands-and-file-descriptors-bash/">new file descriptor</a> to send the output of the verbose log to something other than stdout. However, using a new file descriptor will result in an error if the calling script doesn&#39;t define how to use it. Normally you would do this when you call the command. However, sending all the output from the new file descriptor to stdout would get us back to square one and all the logs would still end up in the captured variable.</p>
<pre tabindex="0"><code class="language-bash">function add() {
  result=$(($1 + $2))
  if [[ &quot;$verbose&quot; -eq 1 ]]; then
    # Send output to file descriptor 3
    &gt;&amp;3 echo &quot;adding $1 and $2 for a result of $result&quot;
  fi

  echo $result
}

# Notice that file descriptor 3 is being redirected to stdout (file descriptor 1)
value=$(add 5 3 3&gt;&amp;1)
echo $value  # adding 5 and 3 for a result of 8 8
</code></pre>
<p>Instead what we need to do is use the <a href="https://www.computerhope.com/unix/bash/exec.htm"><code>exec</code> command</a> to tell bash to redirect all output from the new file descriptor to stdout for all commands. Doing this allows us to output the verbose logs to stdout without adding them to the captured variable.</p>
<pre tabindex="0"><code class="language-bash">exec 3&gt;&amp;1
verbose=1

function add() {
  result=$(($1 + $2))
  if [[ &quot;$verbose&quot; -eq 1 ]]; then
    # Send output to file descriptor 3
    &gt;&amp;3 echo &quot;adding $1 and $2 for a result of $result&quot;
  fi

  echo $result
}

value=$(add 5 3)
echo $value  # 8
</code></pre>
<p>Running this would produce the desired result:</p>
<pre tabindex="0"><code class="language-terminal">$ sh script.sh
adding 5 and 3 for a result of 8
8
</code></pre>
]]></content>
    </entry>
    <entry>
        <title type="html"><![CDATA[How My Team Conducts a Technical Interview]]></title>
        <id>https://stevenklambert.com/writing/how-my-team-conducts-techincal-interview/</id>
        <link href="https://stevenklambert.com/writing/how-my-team-conducts-techincal-interview/">
        </link>
        <updated>2021-07-20T00:00:00.000Z</updated>
        <summary type="html"><![CDATA[In response to a tweet, I discuss the process my team uses for our technical interviews.]]></summary>
        <content type="html"><![CDATA[<p>I saw a <a href="https://twitter.com/techgirl1908/status/1417654242047823872">tweet from Angie Jones</a> which said:</p>
<blockquote>
<p>less content about how to pass tech interviews. more content about how to conduct tech interviews.</p>
</blockquote>
<p>I&#39;ve been conducting a lot of technical interviews recently, so inspired by Angie&#39;s tweet I wanted to write about my teams process for conducting a technical interview. But before I talk about the interview process itself I want to give some context to the role the interviewees are applying for. </p>
<p>My team is responsible for maintaining the accessibility testing engine <a href="https://github.com/dequelabs/axe-core">axe-core</a>, and <a href="https://github.com/dequelabs/axe-core-npm/">axe-core-npm</a> which are integrations of axe-core into various frameworks and technologies. Since our team works with so many different frameworks, we expect the candidate to be willing to learn frameworks they may not be familiar with, and sometimes even become subject matter experts on them for the team. </p>
<p>We&#39;re also a fully remote team which means the candidate will be working by themselves for good portions of the day. This means we expect the candidate to be able to understand how to learn on their own as well as know when to ask for help. We do a lot of pairing on the team and are always willing to jump on Zoom to discuss a problem or even be a <a href="https://en.wikipedia.org/wiki/Rubber_duck_debugging">rubber duck</a>.</p>
<p>We&#39;ve made sure to document these requirements as part of the job description.</p>

<h2><a name="the-pre-interview-assignment" class="heading-link" href="#the-pre-interview-assignment">The Pre-interview Assignment</a></h2>
<p>Before a technical interview takes place, we give the candidate a small take-home pre-interview assignment that they&#39;ll bring to the interview. The assignment focuses on configuring one of our open-source APIs to do a small task. We&#39;ve made sure the task is neither large nor time consuming, and we allow the candidate a few days to complete it before the interview.</p>
<p>The purpose of the assignment is to ensure that the candidate is willing to learn something new (most users have not configured our API in this manner) and understands how to read at our public documentation to find the answer. It also serves as an introduction to our open-source code as the technical interview will leverage that knowledge.</p>

<h2><a name="the-technical-interview" class="heading-link" href="#the-technical-interview">The Technical Interview</a></h2>
<p>My team fully understands that traditional technical interviews do not work well. We&#39;re also a remote team so we can&#39;t do traditional in-person interviews anyway. We&#39;ve spent a lot of time trying to come up with an alternative method that can help us unbiasedly assess the technical ability of a candidate.</p>
<p>To start, we use a similar process to <a href="https://larahogan.me/blog/onsite-interview-loop-template/">Lara Hogans Onsite Interview Template</a>. We&#39;ve created a list of signals that we are looking for in a candidate based on the job requirements listed in the job posting. Using these signals, we created an evaluation form that we can fill out during, or immediately after, the interview. The evaluation form is essentially a list of questions about the candidate that relate to the signals. This form helps us see at a glance how well the candidate did and helps us evaluate one candidate over another.</p>
<p>We&#39;ve even made sure that what we evaluate for is adjusted based on the position. We expect more from senior developer candidates than mid level candidates and have created separate evaluation forms that take into account those differences. We&#39;ve been really pleased with how it&#39;s turned out.</p>
<p>The technical interview itself is quite unique. We don&#39;t ask any technical or algorithmic questions. Instead we essentially do a pairing session (cameras off) with the candidate and ask them to work with us to solve a problem. </p>
<p>We provide a small, fully working boilerplate project (with tests) that has the main part of the program stubbed out. We also provide a README with the problem defined and a list of requirements for the project. The project is similar to something we would do on the job, which gives the candidate a good feel for the types of things they&#39;ll be working on if they were to join the team.</p>
<p>We let the candidate drive the coding session while sharing their screen. We are there to support them, answer their questions, and help them work out the solution to the problem. We very much allow and encourage looking up answers, using Stack Overflow, reading the documentation, etc. After all, we don&#39;t care so much what you know off the top of your head but more about how you go about finding answers.</p>
<p>The requirements are set up in such a way that there are more things to do in the project than the candidate would have time to complete in the interview. This way we can tell them that we&#39;re only interested in how they go about solving the problem, not how much they can solve.</p>
<p>Because this is a non-standard approach to a technical interview, we try to be very clear upfront about it. The day before the interview we send out an email to the candidate telling them what they can expect from the interview. We try to be very clear about what we&#39;ll be doing in the interview, what they can do and lookup, and the goals of the interview.</p>
<p>We hope that by doing this (allowing looking up answers, not worrying about how much they do, telling them ahead of time our expectations), the candidate feels less stressed over the interview and can be more comfortable during it.</p>

<h2><a name="rational-of-the-technical-interview" class="heading-link" href="#rational-of-the-technical-interview">Rational of the Technical Interview</a></h2>
<p>There are many reasons why we do our technical interviews this way instead of say, a full take-home assignment. </p>
<p>First, we&#39;ve discovered that doing a pairing session with a candidate can help us see their potential. Potential is something that you can&#39;t test for nor can see very easily in the final product. We once had a mid-level candidate read the requirements document and then tell us how they thought the program should be structured to make it work. Without writing a single line of code, we could tell that the candidate had a good grasp of technical design. That&#39;s not something we could have known otherwise.</p>
<p>Second, we want to see how the user goes about learning a new codebase. The ability to read an unfamiliar code base and understand how it works is extremely important for our team. By being able to watch them learn the code, we can see into their learning process. A side benefit is that by seeing how they learn, we can adjust the onboarding process to better match their learning style.</p>
<p>Lastly, we want to get a feeling for how the candidate would be to work with. Do they respond well to suggestions? How is their personality while working on a problem? How much do their try to solve the problem on their own vs having us drive the solution? </p>
<p>Of course, this process may not work for every team nor every candidate. Overall we feel we have succeeded in our goal to create a better technical interview process that works well for our teams needs.</p>
]]></content>
    </entry>
    <entry>
        <title type="html"><![CDATA[A Comprehensive Guide to Building and Packaging an Electron App]]></title>
        <id>https://stevenklambert.com/writing/comprehensive-guide-building-packaging-electron-app/</id>
        <link href="https://stevenklambert.com/writing/comprehensive-guide-building-packaging-electron-app/">
        </link>
        <updated>2021-03-07T00:00:00.000Z</updated>
        <summary type="html"><![CDATA[Building and Packaging an Electron App wasn't as straight forward as I had hoped. This guide aims to help you navigate the complexities of doing so and avoid pitfalls along the way.]]></summary>
        <content type="html"><![CDATA[<p>I recently went through the gauntlet that is trying to build and package an <a href="https://www.electronjs.org/">Electron</a> app. I say gauntlet as the entire process of figuring out all the different ways there are to package an app for distribution was quite exhausting and a bit frustrating.</p>
<p>The main problem I had was that there are lots of different tools and ways to package an app. There&#39;s <a href="https://www.electronforge.io/">electron-forge</a>, <a href="https://github.com/electron/electron-packager">election-packager</a>, and <a href="https://www.electron.build/">election-builder</a>. Each one claims to be either a &quot;complete tool&quot; or &quot;complete solution&quot; to create, package, and distribute an Electron app. Each does a slightly different thing and figuring out which one to use to do what I wanted was difficult.</p>
<p>This guide aims to help you navigate these different tools and how to use them so you can choose the right one for your needs. It will also try to help you avoid the pitfalls I stumbled into while learning them.</p>
<p>What this guide does not cover are the various ways to integrate Electron into different frameworks, for example Wepback. This guide will only cover Electron itself and its various tools.</p>
<p>So without further ado, let&#39;s dive in.</p>

<h2><a name="table-of-contents" class="heading-link" href="#table-of-contents">Table of Contents</a></h2>
<ul>
<li><a href="#building-an-electron-app">Building An Electron App</a><ul>
<li><a href="#communicating-with-the-main-process">Communicating with the Main Process</a></li>
<li><a href="#secure-communication">Secure Communication</a></li>
<li><a href="#opening-devtools-on-windows">Opening DevTools on Windows</a></li>
<li><a href="#building-on-wsl">Building on WSL</a></li>
<li><a href="#other-problems">Other Problems</a></li>
</ul>
</li>
<li><a href="#packaging-an-electron-app">Packaging an Electron App</a><ul>
<li><a href="#prerequisites-for-packaging-windows-apps-on-mac">Prerequisites for Packaging Windows Apps on Mac</a></li>
<li><a href="#electron-forge">electron-forge</a></li>
<li><a href="#electron-packager">electron-packager</a></li>
<li><a href="#electron-builder">electron-builder</a></li>
<li><a href="#which-packaging-tool-to-use">Which Packaging Tool to Use</a></li>
<li><a href="#packaging-on-wsl">Packaging on WSL</a><ul>
<li><a href="#no-audio-in-electron-app">No Audio in Electron App</a></li>
<li><a href="#mac-package-didnt-work">Mac Package Didn&#39;t Work</a></li>
</ul>
</li>
</ul>
</li>
</ul>

<h2><a name="building-an-electron-app" class="heading-link" href="#building-an-electron-app">Building An Electron App</a></h2>
<p>Before you can package an Electron app, you first must build one. I found building an app to be the easiest part of the whole process. The <a href="https://www.electronjs.org/docs/tutorial/quick-start">Electron Quick Start Guide</a> was indeed quick and I was able to get my app booted in Electron following their guide without any problems.</p>
<p>However, problems arose as I started trying to integrated Electron APIs into my app. Below are some common problems I ran into and their solutions.</p>

<h3><a name="communicating-with-the-main-process" class="heading-link" href="#communicating-with-the-main-process">Communicating with the Main Process</a></h3>
<p>As far as I could tell, the Electron docs do not cover communicating between the app and the main process. </p>
<p>The most common way to do that is to use the <a href="https://www.electronjs.org/docs/api/ipc-renderer#ipcrenderer">ipcRenderer</a> to send and receive messages. For example, if you wanted to send a command to tell the <a href="https://www.electronjs.org/docs/api/app#appquit">app to quit</a>, you would do the following:</p>
<pre tabindex="0"><code class="language-js">// inside the main process (e.g. main.js)
const { app, BrowserWindow, ipcMain } = require(&#39;electron&#39;);

function createWindow () {
  const win = new BrowserWindow({
    webPreferences: {
      nodeIntegration: true
    }
  });

  win.loadFile(&#39;index.html&#39;)
}

app.whenReady().then(createWindow);

ipcMain.on(&#39;quit-app&#39;, () =&gt; app.quit());
</code></pre>
<pre tabindex="0"><code class="language-js">// inside the app (e.g. index.html)
const { ipcRenderer } = require(&#39;electron&#39;);
ipcRenderer.send(&#39;quit-app&#39;);
</code></pre>
<p>Notice that you use the <code>ipcRenderer</code> object in the app to send the message but the <code>ipcMain</code> object to listen for it. Also for this to work you must enable <code>webPreferences.nodeIntegration</code> when you create the browser window, otherwise you cannot use <code>require</code> inside of the app.</p>
<p>However, enabling <code>nodeIntegration</code> is actually a security risk. Allowing your app to not only be able to <code>require</code> arbitrary code but also allow that code to communicate and send arbitrary commands to your main process is dangerous. </p>

<h3><a name="secure-communication" class="heading-link" href="#secure-communication">Secure Communication</a></h3>
<p>There is a <a href="https://github.com/electron/electron/issues/9920#issuecomment-575839738">secure way to handle communicating with your main process</a>. It&#39;s buried deep in an Electron issue not even related to a security problem so it can be very easy to miss.</p>
<p>The gist of the solution is to limit how much access your app has to the <code>ipcRenderer</code> so it can only send and receive very specific commands all while disabling <code>nodeIntegration</code> and other attack vectors. All credit to <a href="https://github.com/reZach">reZach</a> for the following solution.</p>
<pre tabindex="0"><code class="language-js">// inside the main process (e.g. main.js)
const { app, BrowserWindow, ipcMain } = require(&#39;electron&#39;);

function createWindow () {
  const win = new BrowserWindow({
    webPreferences: {
      nodeIntegration: false, // is default value after Electron v5
      contextIsolation: true, // protect against prototype pollution
      enableRemoteModule: false, // turn off remote
      preload: path.join(__dirname, &#39;preload.js&#39;) // use a preload script
    }
  });

  win.loadFile(&#39;index.html&#39;)
}

app.whenReady().then(createWindow);

ipcMain.on(&#39;toMain&#39;, (event, command) =&gt; {
  // process specific commands
});
</code></pre>
<pre tabindex="0"><code class="language-js">// preload.js
const { contextBridge, ipcRenderer } = require(&#39;electron&#39;);

// Expose protected methods that allow the renderer process to use
// the ipcRenderer without exposing the entire object
contextBridge.exposeInMainWorld(
  &#39;api&#39;, {
    send: (channel, data) =&gt; {
      // allow only specific channels
      const validChannels = [&#39;toMain&#39;];
      if (validChannels.includes(channel)) {
        ipcRenderer.send(channel, data);
      }
    },
    receive: (channel, func) =&gt; {
      const validChannels = [&#39;fromMain&#39;];
      if (validChannels.includes(channel)) {
        // Deliberately strip event as it includes `sender` 
        ipcRenderer.on(channel, (event, ...args) =&gt; func(...args));
      }
    }
  }
);
</code></pre>
<pre tabindex="0"><code class="language-js">// inside the app (e.g. index.html)
window.api.send(&#39;quit-app&#39;);
</code></pre>
<p>If you&#39;d like to do even more to secure your app, reZach created a <a href="https://github.com/reZach/secure-electron-template">secure-electron-template</a> repo that you can take from.</p>

<h3><a name="opening-devtools-on-windows" class="heading-link" href="#opening-devtools-on-windows">Opening DevTools on Windows</a></h3>
<p>While developing and testing your Electron app, it&#39;s handy to be able to open the DevTools and inspect the current state or just add breakpoints for debugging. </p>
<p>The easiest way to open the DevTools is to start the app with them opened using <code>webContents.openDevTools()</code>. The function also takes an <code>options</code> argument that lets you define how to open them.</p>
<pre tabindex="0"><code class="language-js">// inside the main process (e.g. main.js)
const { app, BrowserWindow } = require(&#39;electron&#39;);

function createWindow () {
  const win = new BrowserWindow();
  win.webContents.openDevTools();
}

app.whenReady().then(createWindow);
</code></pre>
<p>Unfortunately, although this works fine on Mac, it does not work for Windows. </p>
<p>Luckily, there&#39;s an issue open in Electron which <a href="https://github.com/electron/electron/issues/20069#issuecomment-586642795">has a work around for the problem</a>. The solution is to use <code>webContents.setDevToolsWebContents()</code> and a second browser window set to open the DevTools. All credit to <a href="https://github.com/warrenseine">warrenseine</a> for the following solution.</p>
<pre tabindex="0"><code class="language-js">// inside the main process (e.g. main.js)
const { app, BrowserWindow } = require(&#39;electron&#39;);

function createWindow () {
  const win = new BrowserWindow();
  const devtools = new BrowserWindow();

  win.webContents.setDevToolsWebContents(devtools.webContents);
  win.webContents.openDevTools({ mode: &#39;detach&#39; });
}

app.whenReady().then(createWindow);
</code></pre>

<h3><a name="building-on-wsl" class="heading-link" href="#building-on-wsl">Building on WSL</a></h3>
<p>Most of the time I develop using Mac, but since I was building an Electron app I wanted to test if my app still worked on Windows when built. Using the Windows Subsystem for Linux (WSL) I tried to run the app using <code>npm start</code>.</p>
<p>Unfortunately I couldn&#39;t even start the app. Every time I would run <code>npm run start</code> I would get an error stating that a missing shared library couldn&#39;t be located.</p>
<pre tabindex="0"><code class="language-cli">Error while loading shared libraries: libxshmfence.so.1: cannot open shared object file: No such file or directory
</code></pre>
<p>For the longest time I couldn&#39;t figure out what to do to solve this. Then I discovered the answer <a href="https://www.electronforge.io/guides/developing-with-wsl">buried in the electron-forge docs</a> (of all places). It turns out you need to reinstall node_modules and tell npm to use win32 platform prebuilt binaries.</p>
<pre tabindex="0"><code class="language-cli">rm -r node_modules
npm install --platform=win32
</code></pre>
<p>Once installed, you can now run <code>npm run start</code> and the Electron app should start. </p>
<p>However once started the app wasn&#39;t running. Looking at the Network tab it seems all requests but for the first few were Pending indefinitely. I wasn&#39;t sure how to proceed after that and couldn&#39;t find any information online. I even tried upgrading to use <a href="https://docs.microsoft.com/en-us/windows/wsl/install-win10">WSL2</a> (as I was still on 1) but that didn&#39;t fix the problem.</p>
<p>The only answer I was able to find was to instead <a href="https://github.com/electron-userland/electron-prebuilt/issues/260">install node and electron on Windows itself</a> and then start the electron app from WSL. Not the best solution, but it does seem to work.</p>

<h3><a name="other-problems" class="heading-link" href="#other-problems">Other Problems</a></h3>
<p>These were the problems I ran into, but for more problems and their solutions read <a href="https://blog.avocode.com/4-must-know-tips-for-building-cross-platform-electron-apps-f3ae9c2bffff">4 must-know tips for building cross platform Electron apps</a>.</p>

<h2><a name="packaging-an-electron-app" class="heading-link" href="#packaging-an-electron-app">Packaging an Electron App</a></h2>
<p>As mentioned before, there are 3 different tools to package an Electron app: electron-forge, electron-packager, and electron-builder. As we look at each one we&#39;ll be trying to package an app for Mac, Windows, and Linux.</p>
<p>The Electron Quick Start Guide recommends installing electron-forge to handle packaging so we&#39;ll start with that one.</p>

<h3><a name="prerequisites-for-packaging-windows-apps-on-mac" class="heading-link" href="#prerequisites-for-packaging-windows-apps-on-mac">Prerequisites for Packaging Windows Apps on Mac</a></h3>
<p>If you plan to package your application for Windows on a Mac, you&#39;ll first need to install <a href="https://wiki.winehq.org/Download">Wine</a>. Wine is program that lets non-Windows operating systems run Windows software. Electron packaging tools will use Windows APIs to build the Windows package.</p>
<p>To install Wine on Mac, follow the <a href="https://github.com/Gcenx/wine-on-mac">How to install/about wine on mac</a> guide.</p>

<h3><a name="electron-forge" class="heading-link" href="#electron-forge">electron-forge</a></h3>
<p>First install <a href="https://www.electronforge.io/import-existing-project">electron-forge into your project</a> and run the <code>import</code> command.</p>
<pre tabindex="0"><code class="language-cli">npm install --save-dev @electron-forge/cli
npx electron-forge import
</code></pre>
<p>The <code>import</code> command will configure your app to use electron-forge and add a few package scripts and a config property to your <code>package.json</code>. </p>
<pre tabindex="0"><code class="language-json">&quot;scripts&quot;: {
  &quot;start&quot;: &quot;electron-forge start&quot;,
  &quot;package&quot;: &quot;electron-forge package&quot;,
  &quot;make&quot;: &quot;electron-forge make&quot;
},
&quot;config&quot;: {
  &quot;forge&quot;: {
    &quot;packagerConfig&quot;: {},
    &quot;makers&quot;: [
      {
        &quot;name&quot;: &quot;@electron-forge/maker-squirrel&quot;,
        &quot;config&quot;: {
          &quot;name&quot;: &quot;&lt;appname&gt;&quot;
        }
      },
      {
        &quot;name&quot;: &quot;@electron-forge/maker-zip&quot;,
        &quot;platforms&quot;: [
          &quot;darwin&quot;
        ]
      },
      {
        &quot;name&quot;: &quot;@electron-forge/maker-deb&quot;,
        &quot;config&quot;: {}
      },
      {
        &quot;name&quot;: &quot;@electron-forge/maker-rpm&quot;,
        &quot;config&quot;: {}
      }
    ]
  }
}
</code></pre>
<p><strong>Important Note:</strong> The scripts electron-forge creates will override any scripts of the same name that are already defined. So if you have a <code>start</code>, <code>package</code>, or <code>make</code> script already then they will be overridden by electron-forge.</p>
<p>Once set up, you can run <code>npm run make</code> to build a Mac package and a zip file containing the Mac package of your app (if on Mac). However, it will not build a Windows or Linux package.</p>
<p>At this point I wasn&#39;t sure how to build a Windows or Linux package using electron-forge. Even though the default config provided by the <code>import</code> command sets up a Windows maker using <code>maker-squirrel</code>, it doesn&#39;t produce one. Nor does it produce a Linux package using <code>maker-deb</code>.</p>
<p>I thought maybe the <code>packagerConfig</code> needed to be told to build them. Trying to set <code>&quot;all&quot;: true</code> so that electron-packager would build for all platforms didn&#39;t work as I got an error from electron-forge saying it wasn&#39;t supported.</p>
<pre tabindex="0"><code class="language-cli">Error: config.forge.packagerConfig.all is not supported by Electron Forge
</code></pre>
<p>I next tried to set <code>platforms</code> to <code>[&#39;darwin&#39;, &#39;linux&#39;, &#39;win32&#39;]</code> on the  <code>packagerConfig</code> object but that didn&#39;t do anything as only the Mac application was built again.</p>
<p>Lastly, I noticed that you could pass the <code>make</code> cli command options to specify the platform. I tried passing <code>win32</code> and this somewhat worked as it tried to build a squirrel package. Unfortunately it also produced a very unhelpful error about not being able to spawn mono.</p>
<pre tabindex="0"><code class="language-cli">npm run make -- --platform win32
...
Making for target: squirrel - On platform: win32 - For arch: x64

An unhandled error has occurred inside Forge:
An error occured while making for target: squirrel
spawn mono ENOENT
Error: spawn mono ENOENT
</code></pre>
<p>It would seem that electron-forge cannot package for other platforms (their docs even say as much). As such, my opinion is that using electron-forge is not a solution for cross-platform packaging.</p>
<blockquote>
<p>Target platform to make for, please note you normally can only target platform X from platform X</p>
</blockquote>

<h3><a name="electron-packager" class="heading-link" href="#electron-packager">electron-packager</a></h3>
<p>The next tool is <a href="https://github.com/electron/electron-packager">election-packager</a>. Electron-packager is used by electron-forge to build cross platform packages that the <code>make</code> script then uses to build a package.</p>
<p>First install electron-packager.</p>
<pre tabindex="0"><code class="language-cli">npm install --save-dev electron-packager
</code></pre>
<p>Once installed, you can build for all platforms using the <code>--all</code> flag when running the electron-packager cli. You&#39;ll also need to make sure to provide icons for each platform package to use. Each platform uses a different extension for the icon: <code>.icns</code> for Mac, <code>.ico</code> for Windows, and <code>.png</code> for Linux. </p>
<p>If you have all three icons in a single directory, you can tell electron-packager to use the directory and it will automatically choose the correct icon to use for the package.</p>
<pre tabindex="0"><code class="language-cli">npx electron-packager . &lt;appname&gt; --all --icon=path/to/icons/dir
</code></pre>
<p>Once run, you should have built packages for each of the three platforms and for each different architecture (a total of eleven packages). </p>
<p>If you don&#39;t want all platforms and architectures, you can instead provide the <code>--platform</code> and <code>--arch</code> flags. So if you just wanted Mac x64, and Windows and Linux 32-bit and 64-bit architectures you would do the following:</p>
<pre tabindex="0"><code class="language-cli">npx electron-packager . &lt;appname&gt; --platform=darwin,linux,win32 --arch=ia32,x64 --icon=path/to/icons/dir
</code></pre>
<p>This will produce a warning about Mac and ia32 not being supported, but it will not stop the build from producing the other combinations.</p>
<p>One thing to note about these packages is that they are what&#39;s known as &quot;unpackaged&quot; packages. What that means is that the Windows and Unix executables are not standalone executables. Running them requires additional files that are included in each of their directories.</p>
<p>To distribute these unpackaged packages you&#39;ll need to provide your users with the executable and all the other files. For the most part, this isn&#39;t an ideal way to distribute an app, but can work in some cases (for example, uploading a game to Steam).</p>
<p>If instead you want to distribute a single standalone executable you&#39;ll need to use electron-builder.</p>

<h3><a name="electron-builder" class="heading-link" href="#electron-builder">electron-builder</a></h3>
<p><a href="https://www.electron.build/">Election-builder</a> works in a similar way to electron-forge in that you provide a <code>package.json</code> config object which tells electron-builder which packages to build.</p>
<p>First install electron-builder.</p>
<pre tabindex="0"><code class="language-cli">npm install electron-builder
</code></pre>
<p>Unlike electron-forge, you&#39;ll have to create the <code>build</code> config and scripts manually instead of it being generated for you. The <a href="https://www.electron.build/#quick-setup-guide">electron-builder Quick Setup Guide</a> provides a sample <code>build</code> config and recommend scripts to setup. It also recommends adding a <code>postinstall</code> script to ensure electron-builder is always up-to-date with your native environment.</p>
<pre tabindex="0"><code class="language-json">&quot;build&quot;: {
  &quot;appId&quot;: &quot;your.id&quot;,
  &quot;mac&quot;: {
    &quot;category&quot;: &quot;your.app.category.type&quot;
  }
},
&quot;scripts&quot;: {
  &quot;pack&quot;: &quot;electron-builder --dir&quot;,
  &quot;dist&quot;: &quot;electron-builder&quot;
},
&quot;postinstall&quot;: &quot;electron-builder install-app-deps&quot;
</code></pre>
<p>The <code>pack</code> script will build unpackaged versions of your app, just as electron-packager does. The <code>dist</code> script will build the distribution version of your app, which results in a single standalone executable. </p>
<p>In order to build for multiple platforms you&#39;ll need to expand the <code>build</code> config to include how to build for your platforms of choice, as well as where to find the icons. The <code>icon</code> option can also take a path to the icon directory where it will automatically select the correct extension to use for the platform.</p>
<p>The electron-builder docs do a good job explaining the options for <a href="https://www.electron.build/configuration/mac#MacConfiguration-target">Mac targets</a>, <a href="https://www.electron.build/configuration/win#WindowsConfiguration-target">Windows targets</a>, and <a href="https://www.electron.build/configuration/linux#LinuxConfiguration-target">Linux targets</a>.</p>
<p>A minimalistic build config could look like the following.</p>
<pre tabindex="0"><code class="language-json">&quot;build&quot;: {
  &quot;appId&quot;: &quot;your.id&quot;,
  &quot;icon&quot;: &quot;path/to/icons/dir&quot;,
  &quot;mac&quot;: {
    &quot;category&quot;: &quot;your.app.category.type&quot;
  },
  &quot;win&quot;: {
    &quot;target&quot;: &quot;portable&quot;
  },
  &quot;linux&quot;: {
    &quot;target&quot;: &quot;AppImage&quot;
  }
}
</code></pre>
<p>Afterwards, you can run <code>npm run dist</code> and it should run. If you haven&#39;t set up code signing for your Mac app, the build will let you know but it will package the app without it just fine.</p>
<p>However, just like electron-forge, the <code>dist</code> script only produced a Mac executable (if on Mac). No amount of adjusting the <code>build</code> config would produce a Windows or Linux package. </p>
<p>It turns out that by default the <code>electron-builder</code> command will only build for your current platform. The solution is to provide additional flags to tell it to produce for other platforms. In this case, you want to pass the Mac, Windows, and Linux flags <code>-m</code>, <code>-w</code>, <code>-l</code> (respectively). You can also combine the flags into a single flag <code>-mwl</code> (order doesn&#39;t appear to matter).</p>
<pre tabindex="0"><code class="language-json">electron-builder -mwl
</code></pre>
<p>With that, electron-builder will produce three packaged executables for Mac, Windows, and Linux. These are standalone packages so each of the executables will be able to run by just opening it (no other files needed).</p>

<h3><a name="which-packaging-tool-to-use" class="heading-link" href="#which-packaging-tool-to-use">Which Packaging Tool to Use</a></h3>
<p>Now that we&#39;ve discussed each of the different tools, which one should you use?</p>
<p>Electron-forge only packages for your current platform, so it doesn&#39;t really work for packaging cross platform apps unless you own each of the platforms and don&#39;t mind packaging on each of them separately.</p>
<p>Electron-packager does package for each platform, but it only produces unpackaged applications. This means you&#39;ll need to provide your users with all the files in each package directory in order for the executables to work.</p>
<p>Electron-builder is my recommendation as it packages for each platform and produces packaged applications. It also can produce unpackaged applications so there&#39;s no need to use electron-packager.</p>

<h3><a name="packaging-on-wsl" class="heading-link" href="#packaging-on-wsl">Packaging on WSL</a></h3>
<p>Although I didn&#39;t run into any problems packaging the app on WSL, I did run into a few problems when trying to run the packaged app.</p>

<h4><a name="no-audio-in-electron-app" class="heading-link" href="#no-audio-in-electron-app">No Audio in Electron App</a></h4>
<p>First, if you&#39;re using WSL1 to package the app, some features may not work. </p>
<p>In my case, my app was using the Web Audio API to play music. However when I booted the app no sound would play. I tried to play audio by instead using an Audio element, but that also didn&#39;t work. Using the <code>canPlayType()</code> function for my audio type resulted in &quot;Probably&quot; so that wasn&#39;t the cause.</p>
<p>As with the last WSL problem, I couldn&#39;t find anything online. However, I did discover that the Windows executable package produced on my Mac would play the audio just fine. I concluded that maybe WSL didn&#39;t have any audio drivers and thus electron couldn&#39;t package the app with an audio output device enabled.</p>
<p>I was able to solve the problem though by upgrading to WSL2. If you run into a similar problem I would suggest starting there.</p>

<h4><a name="mac-package-didnt-work" class="heading-link" href="#mac-package-didnt-work">Mac Package Didn&#39;t Work</a></h4>
<p>When I packaged the Mac application I wanted to see if it would actually work on a Mac. Unfortunately the Mac zip archive that electron-builder produces didn&#39;t work. Trying to open the <code>.app</code> file after unzipping it result in a &quot;You do not have permission to open the application&quot; message.</p>
<p>I tried following the solution from <a href="https://apple.stackexchange.com/a/409211">this StackExchange issue</a>, but changing the permissions of all files in the app and removing the quarantine bits didn&#39;t help. Instead, after I did that and tried to open the app I got a new problem saying that the app couldn&#39;t open due to a problem.</p>
<pre><code>Dyld Error Message:
  dyld: Using shared cache: BD3DF5DB-AF3C-3D09-B8D6-4352F71DDBEA
Library not loaded: @rpath/Electron Framework.framework/Electron Framework
  Referenced from: /Users/USER/Downloads/myApp.app/Contents/MacOS/myApp
  Reason: no suitable image found.  Did find:
  /Downloads/myApp.app/Contents/MacOS/../Frameworks/Electron Framework.framework/Electron Framework: file too short
  /Downloads/myApp.app/Contents/MacOS/../Frameworks/Electron Framework.framework/Electron Framework: stat() failed with errno=1
</code></pre><p>Digging further I found that someone <a href="https://github.com/electron/electron-packager/issues/164#issuecomment-372611460">suggested archiving with 7zip</a> rather than zip. Changing the Mac <code>target</code> to <code>7z</code> produced a 7zip archive which after unzipping was able to open without the previous errors.</p>
<pre tabindex="0"><code class="language-json">&quot;build&quot;: {
  &quot;mac&quot;: {
    &quot;target&quot;: &quot;7z&quot;
  }
}
</code></pre>
<p>Of course since the app is unsigned Apple Gatekeeper will prevent you from opening it as it&#39;s from an unidentified developer. Code signing doesn&#39;t work on non-Mac platforms so the only way to open it is to right click the app and click &quot;Open&quot; from the context menu. </p>
<p>Doing this should allow you to open the app without further issues.</p>
]]></content>
    </entry>
    <entry>
        <title type="html"><![CDATA[Calculating the Position of a Game Object Relative to the Camera in Phaser 3]]></title>
        <id>https://stevenklambert.com/writing/phaser-3-game-object-position-relative-camera/</id>
        <link href="https://stevenklambert.com/writing/phaser-3-game-object-position-relative-camera/">
        </link>
        <updated>2021-02-28T00:00:00.000Z</updated>
        <summary type="html"><![CDATA[For when you want to know the position of a game object relative to the top-left corner of the canvas.]]></summary>
        <content type="html"><![CDATA[<p>While working on <a href="https://www.keridwengame.com/">Keridwen</a>, an accessible JavaScript puzzle game, I needed to get the absolute position of a game object in Phaser 3. That is, I had a large scrolling scene and I needed to know where the game object was drawn relative to the top-left corner of the canvas.</p>
<p>Looking through the Phaser docs I couldn&#39;t find an API that would give me that information, so I decided to try to calculate the position myself. After a few hours of trail and error I was finally able to to do it.</p>
<p>My initial attempts at calculating the position involved trying to use the main cameras <a href="https://photonstorm.github.io/phaser3-docs/Phaser.Cameras.Scene2D.Camera.html#scrollX">scroll position</a> to offset the objects <a href="https://photonstorm.github.io/phaser3-docs/Phaser.GameObjects.Components.Transform.html#x">world position</a>. However, that didn&#39;t work out and it became super complicated trying to take into account when the camera stopped moving at the edges of the world.</p>
<p>I finally just looked at all the camera properties and stumbled upon the <a href="https://photonstorm.github.io/phaser3-docs/Phaser.Cameras.Scene2D.Camera.html#worldView">worldView property</a>. This property is the current world rectangle that the camera is viewing. Importantly, the <code>x</code> and <code>y</code> position defines the top-left corner of the canvas. </p>
<p>Using this, all we have to do is subtract the game objects world position by the cameras world view position and we have the game objects position relative to the top-left corner of the screen. If your camera is zoomed we&#39;ll also need to multiply the final result by the camera zoom.</p>
<pre tabindex="0"><code class="language-js">function getRelativePositionToCanvas(gameObject, camera) {
  return {
    x: (gameObject.x - camera.worldView.x) * camera.zoom,
    y: (gameObject.y - camera.worldView.y) * camera.zoom
  }
}
</code></pre>
]]></content>
    </entry>
    <entry>
        <title type="html"><![CDATA[Reducing Axe-core File Size: Trie Stored as Nested Arrays]]></title>
        <id>https://stevenklambert.com/writing/axe-core-file-size-trie-nested-arrays/</id>
        <link href="https://stevenklambert.com/writing/axe-core-file-size-trie-nested-arrays/">
        </link>
        <updated>2020-09-24T00:00:00.000Z</updated>
        <summary type="html"><![CDATA[How I was able to save more than 17 kB gzipped from a single file.]]></summary>
        <content type="html"><![CDATA[<p>Recently axe-core decided to adopt a size budget as part of an ongoing effort to improve our performance. We noted that axe-cores file size <a href="https://github.com/dequelabs/axe-core/issues/2357">had more than doubled</a> since the last major release and that we needed to start monitoring our size better.</p>
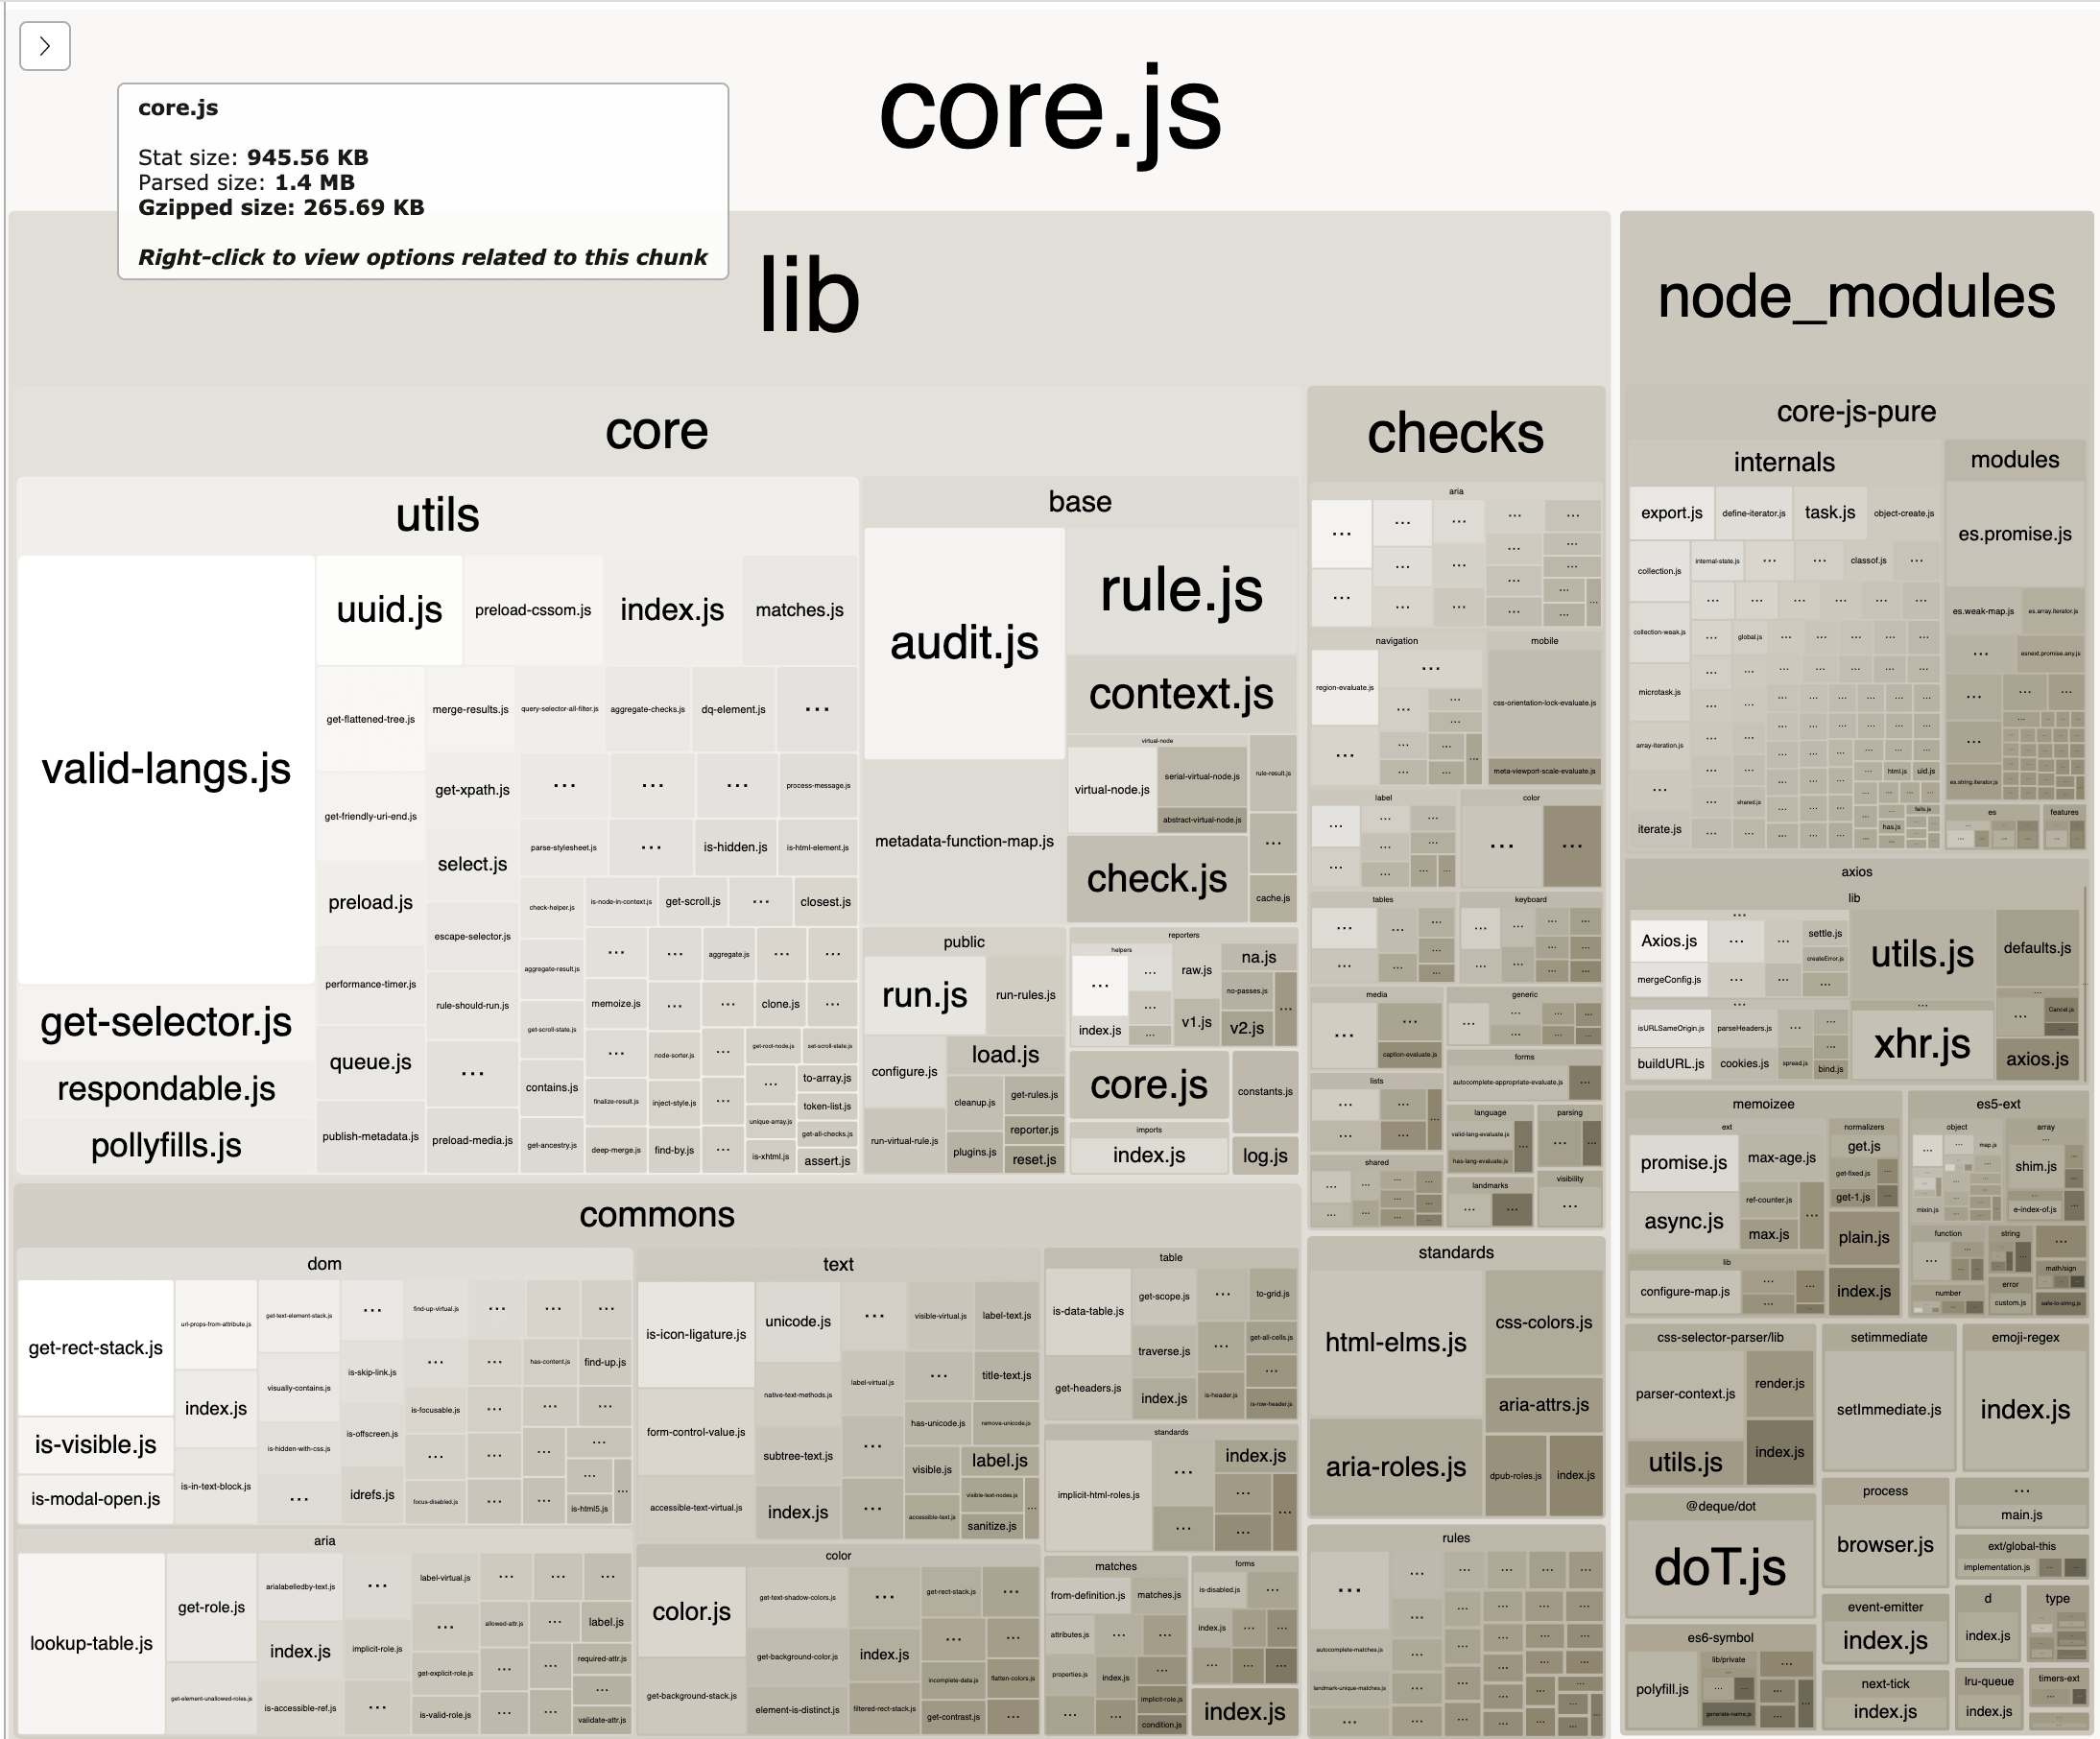
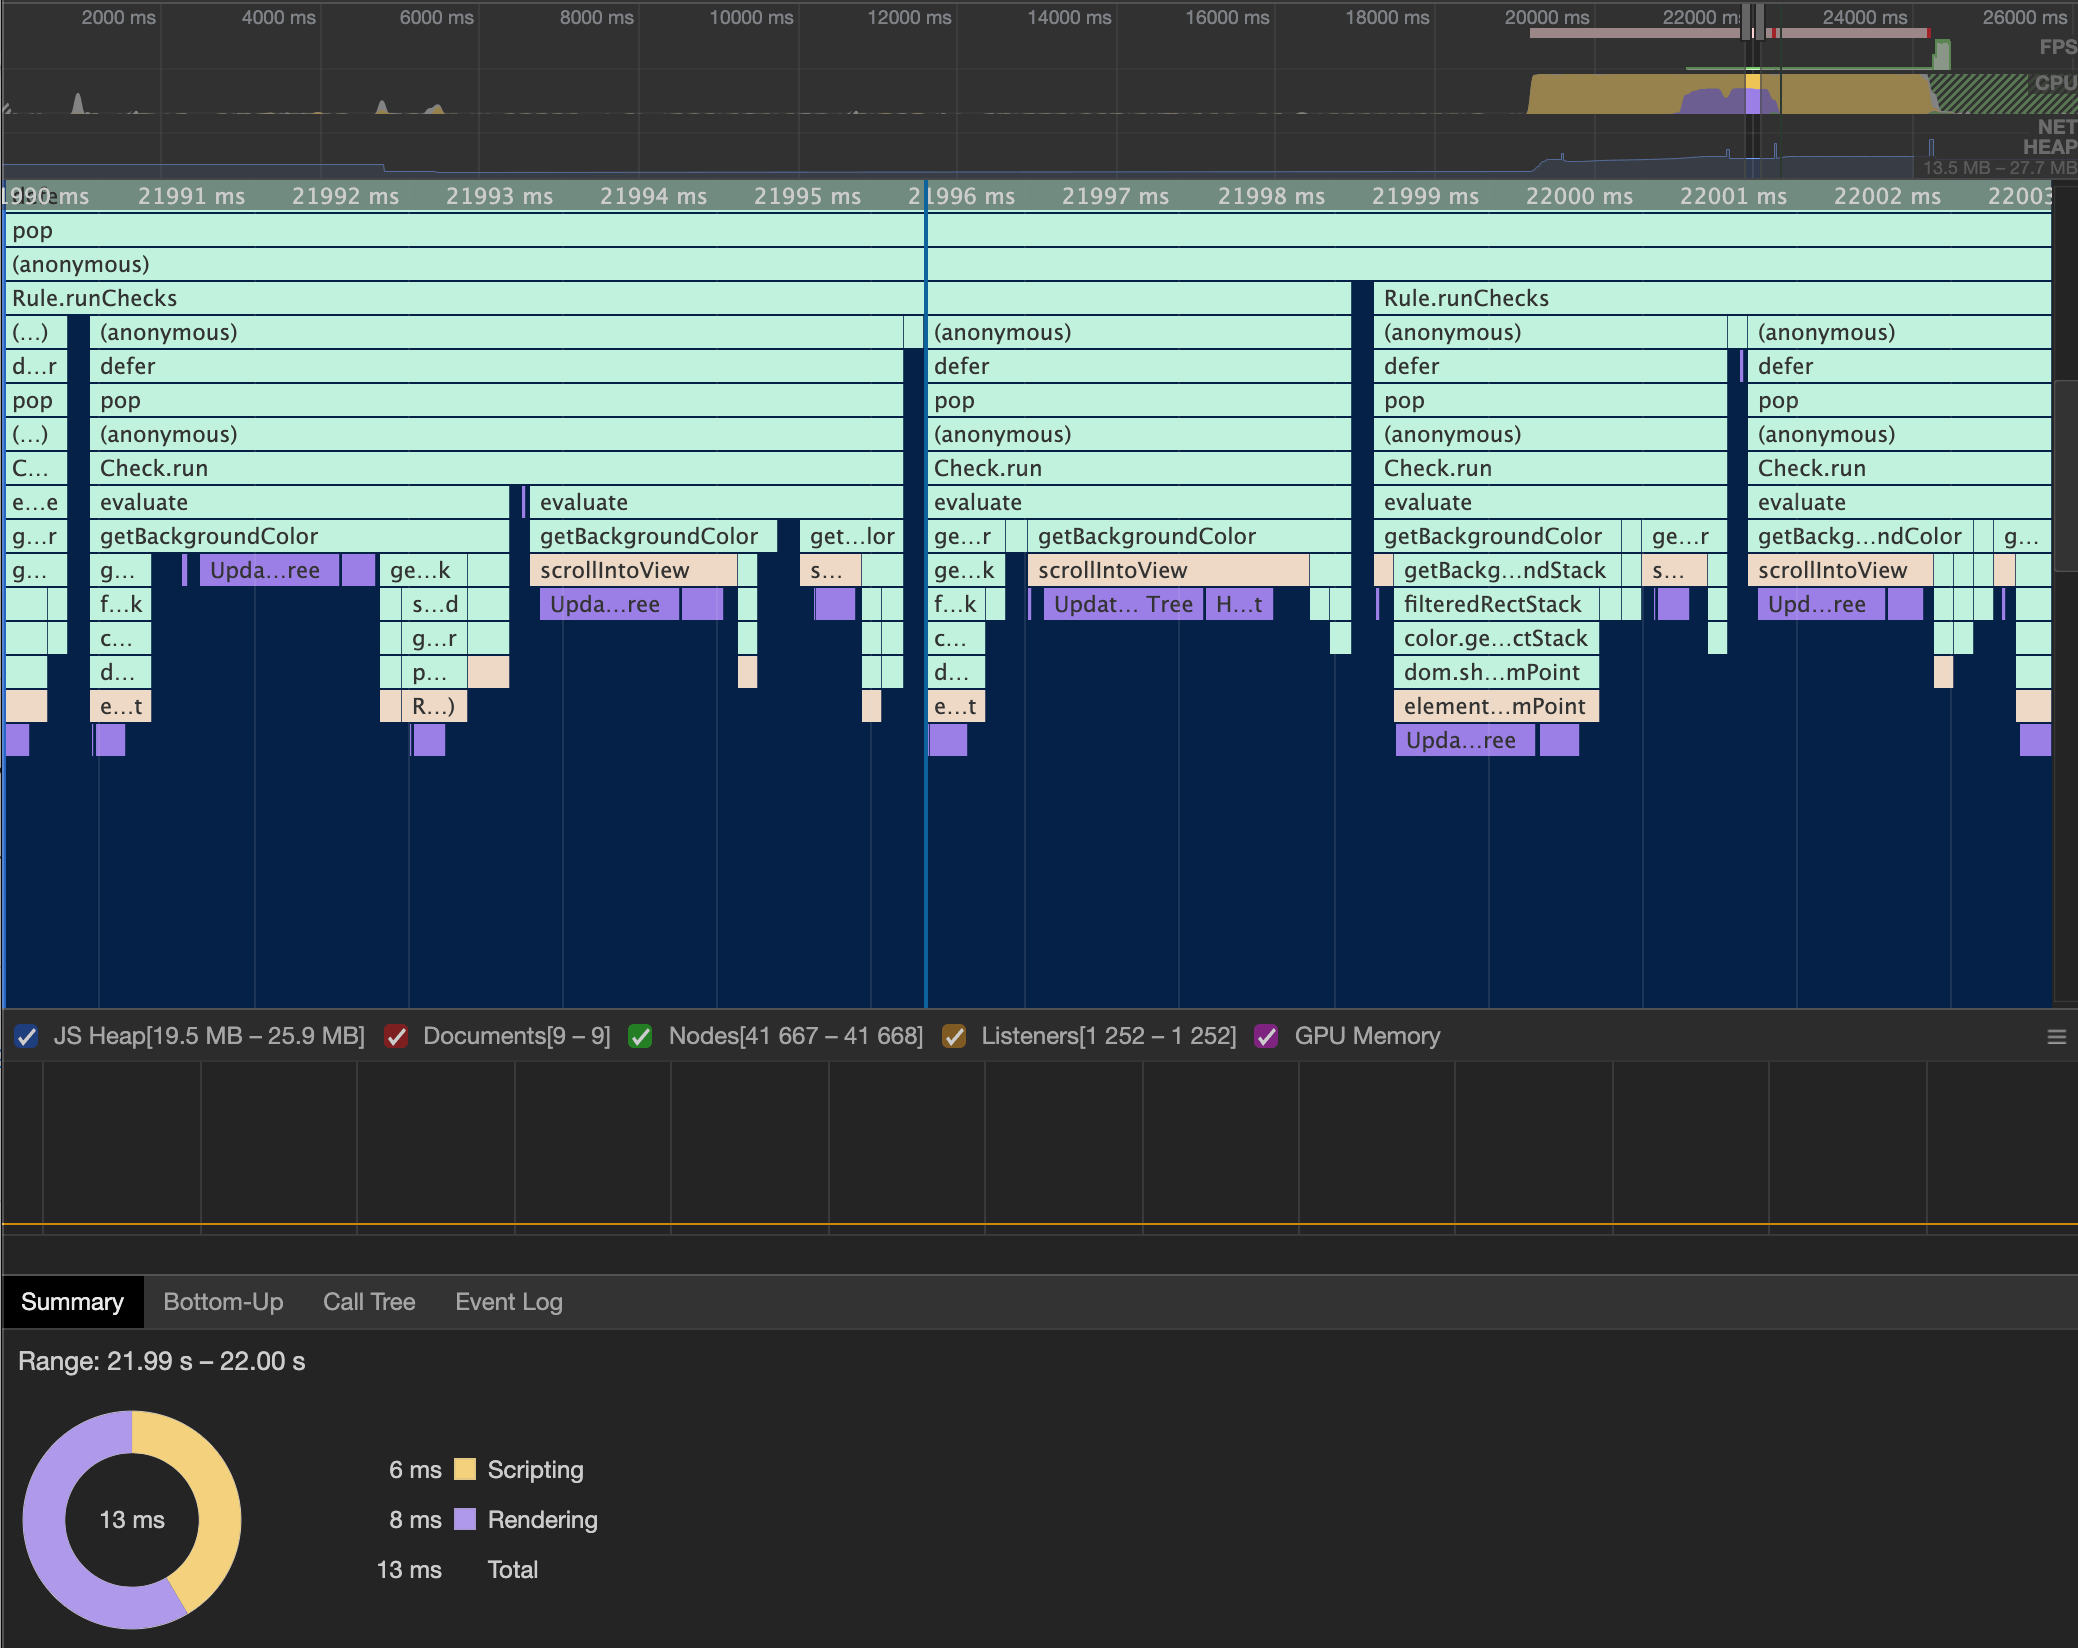
<p>With the budget in place, I started investigating ways to reduce the file size. We use webpack to bundle axe-core so I used <a href="https://github.com/dequelabs/axe-core/issues/2357">webpack-bundle-analyzer</a> to see a detailed view of how large each file was.</p>
<figure>
    <a href="/images/axe-core-bundle-size.png">
        <img class="lazyload" data-src="/images/axe-core-bundle-size.png" alt="" width="2078" height="1648">
        <noscript>
            <img src="/images/axe-core-bundle-size.png" alt="" width="2078" height="1648"/>
        </noscript>
    </a>
    <figcaption>Webpack-bundle-analyzer output of axe-core. Click for larger image</figcaption>
</figure>

<p>As you may have noticed, there are a few large files that make up our core codebase. The largest of those is a file called <code>valid-langs.js</code>. This particular file is 48 kB minified and 20 kB gzipped. Looking into the file it was a list of all ISO 639-1 and 2 codes that we use to validate the value of the HTML <code>lang</code> attribute.</p>
<p>Thinking about how to reduce the file size, <a href="https://github.com/dequelabs/axe-core/issues/1935#issuecomment-694419629">someone from the Google Lighthouse team</a> suggested using a <a href="https://en.wikipedia.org/wiki/Trie">trie data structure</a>. It was a good idea, but I was having trouble figuring out how to store the structure that would result in a smaller file size.</p>
<p>I then remember that there was a <a href="https://keithclark.github.io/ZzFXM/">music player</a> used for the js13kGames game jam that could store entire songs in less than 1 kB gzipped. They used a technique to store all the information of a song as &quot;a series of nested arrays containing instrument, pattern and sequence data.&quot; It turns out JavaScript is really good at compressing nested arrays of numbers. </p>
<p>I figured if they could store songs in such a small size I could use the same technique to store a trie of stings. I discovered that I could store the data as a sequence of nested arrays, where each index represented the letter (a = 0, b = 1, c = 2, etc.). For example, the string <code>aaa</code> could be stored as <code>[[[1]]]</code>. I could then check if the string <code>aaa</code> was valid by converting each letter to its index and navigating the nested arrays. If at any point the index returned <code>null</code>, the string was invalid.</p>
<p>However, this resulted in one and two character strings that started with the same sequence to also be valid. For example, the string <code>a</code> should be invalid but would return valid since there are valid 3 character strings that start with <code>a</code>. </p>
<p>To account for this, I decided to make the letters 1 indexed so that I could use the 0th index to denote if the one or two character string was valid (by padding the end of the string with the <code>`</code> character). For example, the string <code>aaa</code> and <code>aa</code> are valid, and can be stored as <code>[,[,[1,1]]</code>. Since the string <code>a</code> is turned into <code>a``</code>, it returns invalid as the 2nd nested arrays 0th index is empty.</p>
<p>Doing this to all ISO 639-1 and 2 codes resulted in a total file size of 2 kB gzipped, about 17 kB in savings! </p>
<p>Below is the code for converting an array of strings into a trie of nested arrays and a function to determine if a given string is valid:</p>
<pre tabindex="0"><code class="language-js">const strings = [...];  // array of strings
const enocdedStrings = [];

strings.forEach(str =&gt; {
  str = str.padEnd(3, &#39;`&#39;);
  let array = enocdedStrings;
  str.split(&#39;&#39;).forEach((char, i) =&gt; {
    // index is 1 indexed
    const index = char.charCodeAt(0) - 96;
    if (i &lt; str.length - 1) {
      array[index] = array[index] || [];
      array = array[index];
    }
    else {
      array[index] = 1;
    }
  });
});

/**
 * Determine if a string is a valid entry in the trie.
 * @param {String} str - String to validate.
 * @return {Boolean}
 */
function isValid(str) {
  let array = enocdedStrings;
  str = str.padEnd(3, &#39;`&#39;);

  for (let i = 0; i &lt;= str.length - 1; i++) {
    const index = str.charCodeAt(i) - 96;
    array = array[index];
    if (!array) {
      return false;
    }
  }

  return true;
}
</code></pre>
]]></content>
    </entry>
    <entry>
        <title type="html"><![CDATA[Custom 404 Page Without a Server]]></title>
        <id>https://stevenklambert.com/writing/custom-404-without-server/</id>
        <link href="https://stevenklambert.com/writing/custom-404-without-server/">
        </link>
        <updated>2020-08-23T00:00:00.000Z</updated>
        <summary type="html"><![CDATA[How to create a custom 404 page without needing a server.]]></summary>
        <content type="html"><![CDATA[<p>I recently wanted to know if it was possible to create a custom 404 page for a website if you didn&#39;t have access to the backend server. I thought it might be difficult since without a server you wouldn&#39;t be able to catch the request for pages and return the 404 page based on a failed request. </p>
<p>After my research didn&#39;t turn up anything, I had an idea that I thought might work. </p>
<p>I remembered that Service Workers could intercept network requests and respond with cached resources. Typically this is used to serve a custom offline page when the user navigates to a page that hasn&#39;t been cached yet. But what if we could use that same principle to serve a custom 404 page when the request fails?</p>
<p>There wasn&#39;t a lot of information available on doing something that like, but I did find a <a href="https://developers.google.com/web/ilt/pwa/lab-caching-files-with-service-worker">Google lab article on Service Workers</a> which had an small section on serving a custom 404 from the cache. They didn&#39;t list the solution in the article, so I had to <a href="https://github.com/google-developer-training/pwa-training-labs/blob/master/cache-api-lab/05-404-page/sw.js">open their github repo</a> to find it.</p>
<p>Turns out that it is indeed possible to serve a custom 404 page from a service worker. All it takes is first caching the 404 page and then looking at the <code>response.status</code> of a <code>fetch</code> request. If it&#39;s 404, return the cached 404 page. </p>
<p>Now whenever the user enters a URL that isn&#39;t found, the Service Worker will intercept the request and return your custom 404. No server required.</p>
<pre tabindex="0"><code class="language-js">const filesToCache = [
  &#39;/&#39;,
  &#39;404.html&#39;
];
const staticCacheName = &#39;pages-cache-v1&#39;;

self.addEventListener(&#39;install&#39;, event =&gt; {
  event.waitUntil(
    caches.open(staticCacheName).then(cache =&gt; {
      return cache.addAll(filesToCache);
    });
  );
});

self.addEventListener(&#39;fetch&#39;, event =&gt; {
  event.respondWith(
    caches.match(event.request).then(response =&gt; {
      // found a cached resource
      if (response) {
        return response;
      }

      // request the non-cached resource
      return fetch(event.request).then(response =&gt; {

        // fetch request returned 404, serve custom 404 page
        if (response.status === 404) {
          return caches.match(&#39;404.html&#39;);
        }
      });
    });
  );
});
</code></pre>
]]></content>
    </entry>
    <entry>
        <title type="html"><![CDATA[Ravaged Space Postmortem]]></title>
        <id>https://stevenklambert.com/writing/ravaged-space-postmortem/</id>
        <link href="https://stevenklambert.com/writing/ravaged-space-postmortem/">
        </link>
        <updated>2020-03-03T00:00:00.000Z</updated>
        <summary type="html"><![CDATA[How I came up with, designed, and executed on the idea to create an incremental survival game for the Australian Bushfire Charity Jam.]]></summary>
        <content type="html"><![CDATA[<p>Last month I participated in the <a href="https://itch.io/jam/bushfire-charity-jam">Australian Bushfire Charity Jam</a>. The premise of the game jam was to create a game in two weeks that would be sold as part of a bundle, with all proceeds going to bushfire related charities. </p>
<p>Now that the bundle sale has finished, I wanted to take some time to discuss how I came up with the concept of my incremental survival game <a href="https://straker.itch.io/ravaged-space">Ravaged Space</a>, how I designed it, and how I executed the idea. </p>
<p>But first, if you haven&#39;t played the game yet you should head over to itch.io and play it a few times. It&#39;s free to play in the browser and only takes a few minutes. I&#39;ll wait.</p>
<p>Finished? Great! Let&#39;s begin.</p>

<h2><a name="how-i-came-up-with-the-concept" class="heading-link" href="#how-i-came-up-with-the-concept">How I Came Up With The Concept</a></h2>
<p>When I first heard about the game jam, my first idea wasn&#39;t Ravaged Space. </p>
<p>I had just heard the news story about how Wombats were saving other animals during the fires by sharing their burrows. I thought it&#39;d be easy to create a game about a Wombat saving other animals from fires.</p>
<p>However, I wasn&#39;t really interested in the concept. I remembered playing a fun and simple incremental game called <a href="http://js13kgames.com/entries/dwarfs-there-and-back-again">Dwarfs: There and Back Again</a> and it made me want to make an incremental game myself. So I went back and played some other incremental games I enjoyed, such as <a href="http://adarkroom.doublespeakgames.com/">A Dark Room</a> and <a href="https://philome.la/johnayliff/seedship/play/index.html">Seedship</a>.</p>
<p>While brainstorming ideas on what the game should be about, I thought about why the game jam was created in the first place. Due to rapid climate change, the Earth is being destroyed. Thinking about that, I came up with an idea to model the game after climate change. </p>
<p>A game where you start off happily mining resources without really knowing what you&#39;re doing. Where you slowly come to realize that your actions have consequences and you are actively harming yourself. Where you can try to keep up with the high demand you have created but ultimately end up destroying yourself. </p>
<p>Until, that is, you realize that you should slow your pace, try to only consume what you need, and eventually switch over to an alternative source of power. Only then can you win. </p>
<p>If you&#39;ve played the game, you should be able to see exactly how the game follows this model. You may not have realized it at the time, but you are very much playing a political commentary on climate change. Yep, I said it. I made a political game.</p>
<p>After coming up with this idea, I instantly liked how it would play out. The next step was designing it.</p>

<h2><a name="designing-an-incremental-survivor" class="heading-link" href="#designing-an-incremental-survivor">Designing an Incremental Survivor</a></h2>
<p>For the feel of the game, I knew I wanted something that was a bit intense. Some threat that was looming over you, always forcing you to try to be a few steps ahead of it. You know, like climate change.</p>
<p>One thing I knew would be important was a quick feedback loop. The concept of the game was to fail your first few attempts. This meant I would need the game to be played in about 5 minute intervals. Otherwise if it took too long to fail, players would become discouraged at the time they lost and not want to keep playing.</p>
<p>Thinking on all of this, I thought about the game <a href="https://philome.la/johnayliff/seedship/play/index.html">Seedship</a>. I greatly admire the game for not only its great story telling, but also how the games mechanic is always pushing you forward. It also only takes a few minutes to play.</p>
<p>In the game, you need to find a planet rich in a variety of resources, but after each planet you visit you have a chance of damaging your ship. So the game becomes a balancing act of deciding which systems to damage in order to find a better planet. And in the end, your score is a direct result of what systems you were able to save.</p>
<p>So I decided to design my game heavily inspired by Seedship. I wanted to have  a ship with different systems that could be damaged, a bit of story telling, and have the player balance efficiency vs. sustainability. </p>
<p>I started jotting down a few pages of notes on how to handle resources and how different systems could interact with one another. After I had refined the ideas down substantially, I started building prototypes to test them. This let me quickly iterate on the ideas until the feel of the game was were I wanted it.</p>
<p>One of the concepts that I had to keep iterating on was the resource systems. I had initially designed it like most incremental games and let you collect an infinite amount of resources. However this hindered the feel of the game as you could just sit and mine forever. So I decided to change it and made the resources very limited.</p>
<p>This lead me to the idea of presenting the status of each system as a bar instead of a number. However, this was hard to balance for as it meant all systems combined couldn&#39;t put more than ten load on any one system. </p>
<p>I ended up creating <a href="https://docs.google.com/spreadsheets/d/1gM2uWDco8opzjFrFSf9uukJR6VBLRbhtMfiNxp7Qvbs/edit?usp=sharing">a spreadsheet</a> of all the systems to calculate how much power per second I would need to generate to offset the max load. I also listed the optimal path I thought the game should go and make sure it didn&#39;t require too much of any resource at a time, trying to stay around a net 0.</p>
<p>The last design step I did was to figure out a tech tree. I tried drawing the tech tree ideas on paper, but it was a bit tedious having to everything just to move boxes around. I found a free online flow chart tool called <a href="https://www.draw.io/">draw.io</a> which I used to draw out my planned tech tree.</p>
<figure>
    <a href="/images/ravaged-space-tech-tree.png">
        <img class="lazyload" data-src="/images/ravaged-space-tech-tree.png" alt="Flow chart of how I thought the game should progress. Most systems could be upgraded 3 times, with each system unlocking another step towards the main goal of finding an alternative power source." width="1321" height="722">
        <noscript>
            <img src="/images/ravaged-space-tech-tree.png" alt="Flow chart of how I thought the game should progress. Most systems could be upgraded 3 times, with each system unlocking another step towards the main goal of finding an alternative power source." width="1321" height="722"/>
        </noscript>
    </a>
    <figcaption>The detailed tech tree for the game. A lot of the tree survived in the final game, though most of the paths changed. Click for larger image</figcaption>
</figure>


<h2><a name="programming-the-game" class="heading-link" href="#programming-the-game">Programming the Game</a></h2>
<p>While prototyping, I quickly realized that trying to hard code every interaction and UI change would become a nightmare to work with. I decided to create my own one-way data-binding. That way I could maintain all the information in a single state object and any time one of the properties changed, it would handle updating the UI accordingly.</p>
<p>The code for a one-way data-binding involved looking at every elements text content and attributes for the data-binding syntax (in my case, I used double brackets <code>{{}}</code>). The value of the data-binding was a dot-separated path to the property to bind to. The code would then register a callback that would be called any time the path was changed.</p>
<p>For example, if I wanted to bind to the value at <code>systems.power.status</code>, I would write </p>
<pre tabindex="0"><code class="language-html">&lt;div&gt;{{systems.power.status}}&lt;/div&gt;
</code></pre>
<p>At first it started as a simple property binding. But as the game progressed I added negation and the ability to call functions to transform the data I also added the ability to have the binding only fire once. That way I could populate some initial data but not have it update later.</p>
<p>I also discovered that when binding to HTML input values of number types (number, range, etc.), the browser would throw a warning about non-numeric content in the <code>value</code> attribute. So I created a data attribute <code>data-bind</code> to say which attribute to bind to.</p>
<pre tabindex="0"><code class="language-html">&lt;input type=&quot;range&quot; data-bind-value=&quot;{{options.volume}}&quot; /&gt;
</code></pre>
<p>Lastly, since I programmed the game with screen reader support in mind, I had to handle different properties when setting attributes. For example, a falsey value would remove the attribute, unless the value was <code>0</code> or if the attribute started with <code>aria</code> and the value was a boolean.</p>
<p>The final binding code is as follows (where <code>event.on</code> is the callback registration).</p>
<pre tabindex="0"><code class="language-js">function setText(el, value) {
  el.innerHTML = value;
}

function setAttribute(el, name, value) {
  // set 0 as a valid attribute
  if (typeof value === &#39;number&#39;) {
    el.setAttribute(name, value);
  }
  // add truthy values or always set boolean aria options
  else if (value || (name.startsWith(&#39;aria&#39;) &amp;&amp; typeof value === &#39;boolean&#39;)) {
    el.setAttribute(name, value);
  }
  // remove falsy values
  else {
    el.removeAttribute(name);
  }
}

// setup bindings. A binding is any string that starts and ends with {{}}, and 
// the content is a dot-separated path. it can also start with ! (negation) 
// and call a transform function using :functionName
// e.g. {{path.to.prop}} {{!path.to.prop}}, {{path.to.prop:transformFunction}}
const bindingRegex = /^\{\{\s?(!?)([\w.]+):?([\w]+)?\s?\}\}$/;
document.querySelectorAll(&#39;*&#39;).forEach(el =&gt; {

// text binding
if (bindingRegex.test(el.textContent)) {
  const match = el.textContent.match(bindingRegex);
  const negation = match[1];
  const path = match[2];
  const transform = match[3];

  const bindOnce = el.hasAttribute(&#39;data-bind-once&#39;);
  if (!bindOnce) {
    event.on(`${path}-changed`, newValue =&gt; {
      newValue = transform ? window[transform](newValue) : newValue;
      setText(el, negation ? !newValue : newValue);
    });
  }

  let currState = state.get(path);
  currState = transform ? window[transform](currState) : currState;
  setText(el, negation ? !currState : currState);
}

// attribute binding
Array.from(el.attributes)
  // no longer make it a live list
  .map(attr =&gt; ({ name: attr.name, value: attr.value }))
  .forEach(({ name, value }) =&gt; {
    if (bindingRegex.test(value)) {
      const match = value.match(bindingRegex);
      const negation = match[1];
      const path = match[2];

      // value attribute on some inputs (number, range, etc.) will throw a
      // warning about not being a valid number when set to a binding
      // string, so we&#39;ll create a binding pointer
      if (name.startsWith(&#39;data-bind&#39;)) {
        el.removeAttribute(name);
        name = name.split(&#39;-&#39;).pop();
      }

      event.on(`${path}-changed`, newValue =&gt; {
        setAttribute(el, name, negation ? !newValue : newValue);
      });

      const currState = state.get(path);
      setAttribute(el, name, negation ? !currState : currState);
    }
  });
</code></pre>
<p>The state code then fires all callbacks whenever a property is changed:</p>
<pre tabindex="0"><code class="language-js">set(path, value) {
  const parts = path.split(&#39;.&#39;);
  let currPath = this._state;

  for (let i = 0; i &lt; parts.length - 1; i++) {
    currPath = currPath[ parts[i] ] || {};
  }

  currPath[ parts[parts.length - 1]  ] = value;
  event.emit(`${path}-changed`, value);
}
</code></pre>
<p>With that, I could write most of the code in just HTML, with a few JavaScipt helpers to handle what should happen when buttons are clicked.</p>
<p>The tedious part of development was managing the large state object for the game. A lot of properties had to be duplicated among the different systems and actions. Adding, removing, or updating anything required editing it in multiple locations. In the end, the state object grew to be about 400 lines long! </p>
<p>It also didn&#39;t help that I was prototyping as I designed so I ended up refactoring the state object quite a few times.</p>
<p>In just one week, I was able to to get most of the basic interactions working and was able to focus on adding the tech tree and balancing for the second week. All while making sure I took lots of breaks to avoid burnout (I&#39;ve burned out a few times on prior game jams).</p>

<h2><a name="making-the-interface-more-understandable" class="heading-link" href="#making-the-interface-more-understandable">Making the Interface More Understandable</a></h2>
<p>When I first made the interface for Ravaged Space, it was written as two tables to help facilitate screen readers. I put each piece of information into it&#39;s own column, which ended up driving a lot of how the interface looked.</p>
<figure>
    <a href="/images/ravaged-space-first-design.png">
        <img class="lazyload" data-src="/images/ravaged-space-first-design.png" alt="A layout with two tables. The first table describes each system, their current stauts, and load. The second table describes each action, how much it produces, and what it costs." width="2242" height="1300">
        <noscript>
            <img src="/images/ravaged-space-first-design.png" alt="A layout with two tables. The first table describes each system, their current stauts, and load. The second table describes each action, how much it produces, and what it costs." width="2242" height="1300"/>
        </noscript>
    </a>
    <figcaption>The first iteration of the games UI with large horizontal gaps between all the information. Click for larger image</figcaption>
</figure>

<p>With only two weeks to design and develop the game, I didn&#39;t really have any time to playtest it. Which was unfortunate because, as I found out later, the UI was really confusing.</p>
<p>Due to the two table design, all the information was spread out too much. Players were so focused on the buttons in the right table they they didn&#39;t notice that the systems were being affected when they clicked the buttons.</p>
<p>Players also didn&#39;t understand that the buttons had a cost associated with them as that information was in two other columns. They also had trouble understanding system load and how it affected the game.</p>
<p>Lastly, players were often confused with the modification popups and didn&#39;t know what they were choosing between.</p>
<p>All in all, the UI was a mess. </p>
<p>While talking about this with other developers and designers at a local Indie Game Meetup, we came up with the idea to condense the UI as much as possible. </p>
<p>The action buttons moved next to the status so players could easily see what changed when they pressed them. Their cost was also added to the button so all the information was in a single place.</p>
<p>To help with system load, I added a cool pulsing effect to the status bar which shows how much of the resource you would lose on a load cycle. I also made it start slow and then get faster as the load cycle came closer.</p>
<p>I also made sure to add what exactly was changing to each modification popup button so it was clear what you were choosing between.</p>
<figure>
    <a href="/images/ravaged-space-final-design.png">
        <img class="lazyload" data-src="/images/ravaged-space-final-design.png" alt="A condensed layout with a single table which describes the status of each system, each action with it's associated cost, and system load" width="1564" height="1524">
        <noscript>
            <img src="/images/ravaged-space-final-design.png" alt="A condensed layout with a single table which describes the status of each system, each action with it's associated cost, and system load" width="1564" height="1524"/>
        </noscript>
    </a>
    <figcaption>The final iteration of the games UI. Click for larger image</figcaption>
</figure>

<p>Playtesting has shown that the updated design is much easier to understand. It&#39;s still not perfect though. </p>
<p>I&#39;ve noticed that players can easily miss when new systems add load, which causes them to lose but not understand why. Hopefully I can address this in the next update by trying to call attention to any changes in system load.</p>

<h2><a name="conclusion" class="heading-link" href="#conclusion">Conclusion</a></h2>
<p>I am very pleased of how the game turned out. I don&#39;t often have a game where it goes exactly how I had planned it. It&#39;s also fun having the game give the exact feeling I wanted it to give. Others have felt this too and have reached out to say how much they&#39;ve loved the game as well. </p>
]]></content>
    </entry>
    <entry>
        <title type="html"><![CDATA[Improving Axe-core Color Contrast Performance]]></title>
        <id>https://stevenklambert.com/writing/axe-core-color-contrast-performance/</id>
        <link href="https://stevenklambert.com/writing/axe-core-color-contrast-performance/">
        </link>
        <updated>2020-01-19T00:00:00.000Z</updated>
        <summary type="html"><![CDATA[A postmortem of how axe-cores color-contrast performance was greatly improved by replacing native APIs.]]></summary>
        <content type="html"><![CDATA[<p>Over the past year, I&#39;ve been making significant performance improvements to axe-core. A few of our rules were <a href="https://github.com/dequelabs/axe-core/issues/1464">very slow on large pages</a> (10k+ DOM nodes), and could even freeze the page if it was too large. Slowly but surely I&#39;ve been able to greatly improve the performance of all but one of these rules.</p>
<p>A few weeks ago we <a href="https://github.com/dequelabs/axe-core/pull/1943">merged the largest and most significant</a> performance improvement to axe-core, a culmination of over 6 months of work, and were finally able to resolve the slowest rule we had: color-contrast. </p>
<p>I wanted to take some time to talk about the work that went into improving the performance of the rule. But before I can talk about how we solved the problem, you need to understand how calculating color-contrast works, and why that caused it to be slow. </p>

<h2><a name="how-to-calculate-color-contrast" class="heading-link" href="#how-to-calculate-color-contrast">How to Calculate Color-Contrast</a></h2>
<p>Calculating the contrast between the foreground and background colors of a element isn&#39;t a straight forward problem. Getting the foreground color is relatively easy as you can just look at the elements <code>color</code> CSS property. Getting the background color of an element is a bit more involved.</p>
<p>To get the background color you need to know the elements visual DOM stack, which is all elements that visually overlap the element sorted by their visual order. </p>
<p>Without CSS involved, this is just the element and all of its ancestors. But positioned elements, negative margins, and transforms can add or remove elements from the stack. For example, an absolutely positioned element can be anywhere on the page and not just visually above its parent element.</p>
<p>Once you have all the elements of the stack, you can look for the closest one that defines a <code>background</code> color, or use the browsers default if none is defined.</p>
<p>Luckily we don&#39;t have to calculate the visual stack ourselves as the browser provides a very handy API called <a href="https://developer.mozilla.org/en-US/docs/Web/API/DocumentOrShadowRoot/elementsFromPoint">document.elementsFromPoint</a> which returns the visual DOM stack. This is what axe-core uses to get the element stack and run our calculations on.</p>

<h2><a name="why-color-contrast-was-slow" class="heading-link" href="#why-color-contrast-was-slow">Why Color-Contrast Was Slow</a></h2>
<p>To figure out why the rule was so slow, I ran a performance audit on the code. Using a <a href="https://developers.google.com/web/tools/chrome-devtools/evaluate-performance/reference">performance analyzer</a>, I was able to use the resulting <a href="https://developer.mozilla.org/en-US/docs/Tools/Performance/Flame_Chart">flame graph</a> to see where the most time was being spent in the code. What it showed me was that two browser APIs were taking the most time: <code>elementsFromPoint</code> and <code>scrollIntoView</code>.</p>
<figure>
    <a href="/images/color-contrast-flame-graph.png">
        <img class="lazyload" data-src="/images/color-contrast-flame-graph.png" alt="Performance graph showing lots of wide stacks with each ending in an Updated Tree rendering call caused by either elementsFromPoint or scrollIntoView" width="2078" height="1648">
        <noscript>
            <img src="/images/color-contrast-flame-graph.png" alt="Performance graph showing lots of wide stacks with each ending in an Updated Tree rendering call caused by either elementsFromPoint or scrollIntoView" width="2078" height="1648"/>
        </noscript>
    </a>
    <figcaption>Every call of <code>scrollIntoView</code> and <code>elementsFromPoint</code> caused a rerendering of the page, resulting in over half the time spent on the rule. Click for larger image</figcaption>
</figure>

<p>Now the reason we were calling <code>scrollIntoView</code> is because the coordinates passed to <code>elementsFromPoint</code> must be within the current viewport (otherwise an empty stack is returned). This means that for every element that is offscreen, we have to scroll the element into view first so we can then call <code>elementsFromPoint</code> on its coordinates. </p>
<p>From the flame graph we can see that those two APIs themselves aren&#39;t taking the most time (they aren&#39;t the last thing in the column), but that each of the APIs cause the browser to rerender. Rerendering a large page is not quick, and having to do it twice for every element on the page was causing the huge bottleneck in our code.</p>

<h2><a name="how-we-fixed-it" class="heading-link" href="#how-we-fixed-it">How We Fixed It</a></h2>
<p>Now that I understood why the color-contrast rule was slow, I needed to figure out if there was a faster way to calculate the element stack that didn&#39;t rely on scrolling the element into view and calling <code>elementsFromPoint</code>. This wasn&#39;t an easy problem as I had to come up with a more performant solution for a browser API, one that didn&#39;t trigger rerendering.</p>
<p>While thinking about this problem, I remembered the <a href="https://developer.mozilla.org/en-US/docs/Tools/3D_View">old Firefox 3D DOM Visualizer</a>, which essentially showed the element stack. Looking at it reminded me of some of the simple HTML games I&#39;ve created where the sprites are just rectangles. </p>
<p>This gave me the idea to treat each element as a sprite and perform <a href="https://developer.mozilla.org/en-US/docs/Games/Techniques/2D_collision_detection">collision detection</a> on them to determine if they collide (or stack) with one another. Any elements that collided would be part of the same visually stack.</p>
<p>However, running collision detection on every element against every other element would be a very slow operation, possibly even slower than our current code. Thankfully I already knew how to solve collision detection performance problems through a technique called <a href="https://en.wikipedia.org/wiki/Space_partitioning">spatial partitioning</a>.</p>
<p>Spatial partitioning is a technique where you divide a space into equal parts and assign each element into one of the parts. Then when you want to run a check, you only need to look at the elements that share the same space. This can help improve performance since you are running the collision check against significantly fewer elements.</p>

<h3><a name="using-a-quadtree" class="heading-link" href="#using-a-quadtree">Using a Quadtree</a></h3>
<p>I first attempted to use a <a href="https://en.wikipedia.org/wiki/Quadtree">quadtree</a> to group all the elements on the page. In a quadtree you divide the space into 4 equal parts (hence the name quad). Each of these parts can be further subdivided into 4 equal parts if they contain more elements than a predefined threshold. Spaces can keep subdividing until a max depth is reached or there are no more elements to add.</p>
<p>Unfortunately, through lots of testing I found that a quadtree took far too long to populate to make it a viable solution on large pages. With 50k+ elements on a page, the quadtree was continually divided and subdivided. Each time it divided I had to recalculate each elements position and add them to their appropriate subdivision.</p>
<p>In total, it took around 5 seconds to finalize and then another 5 seconds to process all the stacks. Although this was better than freezing the browser, I knew it could be faster.</p>

<h3><a name="using-a-2d-grid" class="heading-link" href="#using-a-2d-grid">Using a 2D Grid</a></h3>
<p>I decided to try a simpler approach and create a 2D grid of the page and assign each element to every cell of the grid it belonged to. Then when I needed the stack I would just look at a single grid cell and run a collision check on just those elements.</p>
<p>This proved much faster than the quadtree approach, but I ran into a few problems when elements had scroll regions. Because of the scroll, elements inside scroll regions are not on the same coordinate system as other elements on the page. </p>
<p>For example, an element with a scroll region could visually be only a few hundred pixels tall, but the entire height of the scroll region could be a thousand pixels tall. Only the elements that are inside the current scroll area take up visual space while all of the other elements are essentially hidden. However, elements outside the scroll area could still contribute to the background color of it.</p>
<p>To handle this, I decided to treat each scroll region as its own separate grid. When I encountered an element with a scroll region, I would add the element to the grid as normal. Then I would create a subgrid for that element and add all of its descendants to just the subgrid. </p>
<p>When I wanted to find all elements that belong to the same stack, I would first look at the current elements grid and find all elements that collided with it. Then if the element had a parent grid, I would look the parent grid and find all elements that collided with the parent scroll region, and so forth and so on. </p>
<p>Doing this allowed me to treat each scroll region as it&#39;s own collision space and accurately determine the elements visually stack.</p>

<h2><a name="visually-sorting-the-stack" class="heading-link" href="#visually-sorting-the-stack">Visually Sorting the Stack</a></h2>
<p>Now that the page was visually grouped, I had to finish the process by visually sorting all the elements in the stack.</p>
<p>Sorting elements visually is a lot harder than grouping them by their position. I had to understand exactly how a browser renders a page in order to mimic that rendering though JavaScript. This meant understanding <a href="https://developer.mozilla.org/en-US/docs/Web/CSS/CSS_Positioning/Understanding_z_index/The_stacking_context">stacking contexts</a> and how CSS properties could affect the <a href="https://developer.mozilla.org/en-US/docs/Web/CSS/CSS_Positioning/Understanding_z_index/Stacking_and_float">visual position of elements</a>.</p>
<p>Without CSS involved, visual sorting is mostly just calculating the position of the element in the DOM compared to another element. Any element that comes after another is higher in the visual order. For this, I used the browser API <a href="https://developer.mozilla.org/en-US/docs/Web/API/Node/compareDocumentPosition">Node.compareDocumentPosition</a> to know which elements came after another. </p>
<p>With CSS involved, I also had to <a href="https://github.com/dequelabs/axe-core/blob/develop/lib/commons/dom/get-element-stack.js#L6-L259">manually calculate stacking contexts and CSS position layouts</a> to determine the visual order. Thankfully MDN has great docs on how browsers visually sort elements so I was able to use them as a base reference while writing the code. </p>
<p>One fun problem I ran into was handling positioning of Shadow DOM elements. I discovered that when using <code>compareDocumentPosition</code> on elements in two different DOM trees, it does not correctly return the elements position. Instead, the element in the Shadow DOM would always return as coming after any other element, including the HTML element. </p>
<p>To handle this, I had to walk up each of the DOM trees of the elements until I found a DOM tree they both shared. Then I could compare the position of the respective parent elements in the shared tree to know which element came after the other in the different trees.</p>
<pre tabindex="0"><code class="language-html">&lt;div&gt;
  &lt;div&gt;
    #shadow-dom
      &lt;span id=&quot;A&quot;&gt;Element A&lt;/span&gt;
  &lt;/div&gt;
  &lt;span id=&quot;B&quot;&gt;Element B&lt;/span&gt;
&lt;/div&gt;
</code></pre>
<p>In the above example, <code>#A</code> and <code>#B</code> are in two different DOM trees (as <code>#A</code> is in a Shadow DOM). <code>#A</code>&#39;s parent element shares the same DOM tree as <code>#B</code>, so we can compare these two elements to each other. This allows us to know that <code>#B</code> comes after <code>#A</code>.</p>
<p>Visually sorting the stack took the most time to write and test as I had to do a ton of regression testing every time I made a change. Usually this involved running <code>elementsFromPoint</code> on a lot of pages and then comparing the results to what my code produced. </p>
<p>Doing this did find an interesting discrepancy between how Firefox and Chrome calculate <code>elementsFromPoint</code> though. </p>
<p>From the best that I can tell, there is a very interesting edge case in how the browsers treat floating point numbers when determining which elements belong to a stack. In Chrome they seem to round up the number while in Firefox they keep the number as is. This can cause the browsers to return different results (an element belonging to the stack in Chrome is missing in Firefox).</p>
<p>For our code, I decided not to round the number, mimicking Firefoxs approach.</p>

<h2><a name="memory-use" class="heading-link" href="#memory-use">Memory Use</a></h2>
<p>Now we can&#39;t talk about improving speed without also talking about memory consumption. Improving speed usually comes at the cost of increased memory as you are caching information to improve speed. </p>
<p>So how much memory does saving every element into the 2D grid (and respective subgrids) take? I took three <a href="https://developers.google.com/web/tools/chrome-devtools/memory-problems/heap-snapshots">heap snapshots</a> of a large site (10k+ nodes) to find out. </p>
<p>The first was when the page was loaded and the axe script was on the page but not run. This gave me a baseline to see how much memory the page used by itself.</p>
<p>The next was after running axe but without creating the 2D grid. The last one was after axe had created the 2D grid. </p>
<p>Now typically axe cleans itself up after a run so there won&#39;t be an increase of memory use after it finishes. To compensate for this I made sure to save off axes internal data during the run so I could look at it after the run completed.</p>
<figure>
    <a href="/images/axe-with-2d-grid.png">
        <img class="lazyload" data-src="/images/axe-with-2d-grid.png" alt="" width="2084" height="1702">
        <noscript>
            <img src="/images/axe-with-2d-grid.png" alt="" width="2084" height="1702"/>
        </noscript>
    </a>
    <figcaption>Three memory heap snapshots showing the increased memory use caused by creating the 2D grid. Click for larger image</figcaption>
</figure>

<p>From the snapshots we can see that the page itself has a baseline memory use of 17.6 MB (with axe on the page). After running axe but without creating the 2D grid it uses 23.1 MB, an increase of 5.5 MB. Axe with the 2D grid causes the page to use 29.9 MB, an increase of 6.8 MB from axes normal memory use. </p>
<p>This means that creating the 2D grid and saving all elements to their respective cells doubles the memory use of axe from 5.5 MB to 12.3 MB. </p>
<p>Is this a problem? We didn&#39;t think so. Doubling our memory footprint on very large sites in exchange for actually being able to run the rule in a decent amount of time is worth the memory trade off. However, it&#39;s good to keep that in mind as we move forward so we don&#39;t continue to use too much memory.</p>

<h2><a name="final-result" class="heading-link" href="#final-result">Final Result</a></h2>
<p>After getting the code to work to my satisfaction, and trying to optimize it to the best I could, I was able to get the rule to complete in 5 seconds on even the largest of pages (50k+ nodes).</p>
<figure>
    <a href="/images/grid-perf-flame-graph.png">
        <img class="lazyload" data-src="/images/grid-perf-flame-graph.png" alt="Chrome performance graph showing populating the grid taking 1 second and the color-contrast rule taking another second" width="2084" height="1702">
        <noscript>
            <img src="/images/grid-perf-flame-graph.png" alt="Chrome performance graph showing populating the grid taking 1 second and the color-contrast rule taking another second" width="2084" height="1702"/>
        </noscript>
    </a>
    <figcaption>With the new approach, the color-contrast rule now only takes a few seconds on large sites. Click for larger image</figcaption>
</figure>

<p>From the flame graph you can see that the call to <code>dom.getElementStack</code> takes about one second to complete, and then a lot of very narrow stacks for each element. The <code>getElementStack</code> function is what kicks off creating and populating to the 2D grid. Furthermore, we can see that the code is no longer triggering rerendering anywhere during the run.</p>
<p>If you&#39;re interested in trying out the new code, you can <a href="https://www.npmjs.com/package/axe-core/v/next">download it from NPM</a> using the <code>next</code> tag or use <a href="https://chrome.google.com/webstore/detail/axe-coconut-web-accessibi/iobddmbdndbbbfjopjdgadphaoihpojp?hl=en">axe-coconut</a>. If you find any problems with the color-contrast results, please <a href="https://github.com/dequelabs/axe-core/issues">file an issue</a> so we can fix it. I expect there to be a few kinks to work out.  </p>
]]></content>
    </entry>
    <entry>
        <title type="html"><![CDATA[Detecting Ligature Icons With JavaScript]]></title>
        <id>https://stevenklambert.com/writing/detecting-ligature-icons-with-javascript/</id>
        <link href="https://stevenklambert.com/writing/detecting-ligature-icons-with-javascript/">
        </link>
        <updated>2019-10-22T00:00:00.000Z</updated>
        <summary type="html"><![CDATA[A deep dive into detecting when a string of text has been replaced with a ligature icon.]]></summary>
        <content type="html"><![CDATA[<p>While working on <a href="https://github.com/dequelabs/axe-core">axe-core</a>, an accessibility testing library, we ran into an interesting problem. We needed to be able to detect when a string of text had been replaced by a ligature icon.</p>
<p>A ligature icon is a special type of <a href="https://en.wikipedia.org/wiki/Orthographic_ligature">ligature</a> where instead of a combination of letters it displays an icon. For example, a ligature icon for the word &quot;file&quot; would replace the word with an icon of a file. Examples of a ligature icon fonts include <a href="https://material.io/resources/icons/?style=baseline">Material Icon</a>, <a href="https://kudakurage.com/ligature_symbols/">Ligature Symbols</a>, and <a href="https://symbolset.com/">Symbolset</a>.</p>
<p>The problem with ligature icons is that there is no easy way to detect when a font uses ligatures and what words are associated with ligature icons. </p>
<p>It took me awhile, but I think I found a reliable and accurate way to detect them. If you don&#39;t want to read through my process, you can skip to the end where I post the code.</p>

<h2><a name="different-ideas-for-detecting-ligature-icons" class="heading-link" href="#different-ideas-for-detecting-ligature-icons">Different Ideas for Detecting Ligature Icons</a></h2>

<h3><a name="through-css-properties" class="heading-link" href="#through-css-properties">Through CSS Properties</a></h3>
<p>I initially thought I could detect a ligature font based on the CSS properties used when declaring it. I noticed ligature icon fonts typically use a property called <code>font-feature-settings</code> and thought it might be required to display a ligature icon. However, turning the property off in devtools didn&#39;t stop the icon from displaying so it&#39;s not a requirement to show them. Even though some ligature icon fonts use it, I couldn&#39;t rely on it. </p>
<p>Additionally, just because a font uses ligature icons doesn&#39;t mean that it will only be used for icons. Knowing if it&#39;s a ligature icon font would not be enough to guarantee all uses of it are icons.</p>

<h3><a name="parsing-the-font-file" class="heading-link" href="#parsing-the-font-file">Parsing the Font File</a></h3>
<p> My next idea was seeing if I could parse the font file for information about which words were ligatures. I discovered the website <a href="https://fontdrop.info/">Font Drop</a> which could parse a font file and display all the information about it, including its ligatures. The website said it uses the <a href="https://opentype.js.org/">opentype.js library</a> to parse the font files, which I figured I could also use. </p>
<p> Unfortunately, I soon found out that the library does not support WOFF2 files, which is what Material Icon uses. There&#39;s been <a href="https://github.com/opentypejs/opentype.js/issues/183">an open issue to support it</a>, but so far no work has been done on it. In the same issue, users mentioned <a href="https://github.com/bramstein/opentype">a fork of the library</a> that supposedly supports WOFF2, but it doesn&#39;t seem to be actively developed. This meant that if we ran into issues with the library, we wouldn&#39;t be able to get them fixed without making a fork ourselves, which was less than ideal.</p>

<h3><a name="width-of-the-word" class="heading-link" href="#width-of-the-word">Width of the Word</a></h3>
<p>I next thought I could determine when a ligature icon was used by checking the width of the word. I figured if the word &quot;file&quot; was replaced by a single character icon, then there would be a substantial difference in its rendered width compared to its word width (1 character vs. 4 characters). However, I couldn&#39;t just ask what the width of the <code>textContent</code> was since it would return the word &quot;file&quot; and not the ligature icon.</p>
<p>Whilst thinking about this, I remembered the canvas API <a href="https://developer.mozilla.org/en-US/docs/Web/API/CanvasRenderingContext2D/measureText">measureText</a> which can measure the width of a string based on a given font size and font family. I didn&#39;t know if it could handle ligature icons, but testing it out showed that it could.</p>
<p>I thought I could just add a single whitespace character to the middle of the word so the word would no longer render as an icon, and then compare that width to the width of the unchanged word. This sort of worked until I ran into two problems. </p>
<p>The first problem was that the width of a whitespace character isn&#39;t always consistent, but can differ depending on where it&#39;s located or what letters surround it. For example, in the font <a href="https://fonts.google.com/specimen/Big+Shoulders+Text">Big Shoulders Text</a> a whitespace character at 36px is measured to be 7.45px wide. However, it&#39;s 8.35px wide when between the letters &quot;r&quot; and &quot;e&quot;. This meant that adding a whitespace character in the middle of a word could give different widths depending on which characters the whitespace separated.</p>
<p>The second problem occurred when I found a ligature icon that was only two characters long. The font Ligature Symbols has a ligature icon for the word &quot;vk.&quot; When I took the width of the word at 36px it measured 30.76px wide, while the width of a whitespace character was 12.94px wide. So together I expected the final width of the word and whitespace to be about 43.7px wide. However, the actual width was 49.99px wide, a difference of about 6px. </p>
<p>Since a whitespace character can differ in width, I couldn&#39;t be sure if that 6px difference was due to the word being replaced by a ligature icon or because the whitespace character was longer between the &quot;v&quot; and &quot;k.&quot;</p>
<p>I also tried to measure the width of each individual character and add them together to get the final expected width, but this also proved to have too much variance due to letter spacing differences. In another experiment, I tried adding a zero-width-space character to the word but it seems the browser ignores these when determining the ligatures and so it didn&#39;t change the width from the word without a zero-width-space.</p>

<h3><a name="compare-image-data" class="heading-link" href="#compare-image-data">Compare Image Data</a></h3>
<p>My last idea to try, and the one that ended up working, was to compare the pixel data of the first character to the pixel data of the entire word. The idea was that if I created a canvas the exact size of the first character and drew that character, drawing the entire word on the same size canvas (so the remaining letters wouldn&#39;t be visible) should produce the same image of the first character. If the images were different, I would know that the word was replaced by a ligature icon.</p>
<p>Before I started working on this solution, I already knew I was going to have to account for normal ligatures such as ae, fi, and ffi. That meant that small differences in the image should be ignored. It also meant that that the canvas size would need to be large enough to account for some pixels changing due to ligatures, but small enough to be performant when calling <code>getImageData</code> and looping through the data (twice).</p>
<p>As I began thinking about this, it all started to sound like a statistics problem in that I needed a large enough canvas size (sample size) to detect a (statistically) significant change. So I thought why not break out the statistics! After all, my high school teacher would be proud knowing I finally got to use it after all these years.</p>
<p>Note: the goal wasn&#39;t to be statistically accurate, but to use statistics to help inform our decision about numbers. That way I wasn&#39;t just choosing magic numbers out of a hat but had some reasoning behind them.</p>

<h4><a name="determining-sample-size" class="heading-link" href="#determining-sample-size">Determining Sample Size</a></h4>
<p>In statistics, there&#39;s a few ways you can determine sample size depending on what information you already have or can find. For my particular case, I needed to choose a sample size without knowing anything about the data (it&#39;s mean, standard deviation, etc.). Luckily, there&#39;s a <a href="https://select-statistics.co.uk/calculators/sample-size-calculator-population-proportion/">formula for determining sample size</a> based only on how confident you want to be (confidence interval) and how much margin of error to account for.</p>
<pre tabindex="0"><code class="language-math">X = Z**2 ­* p * (1 - p) / MOE**2
</code></pre>
<p>Where:</p>
<ul>
<li>X = sample size </li>
<li>Z = z-score (determined from the <a href="https://www.mathsisfun.com/data/confidence-interval.html">confidence interval</a>)</li>
<li>p = sample proportion (the expected results)</li>
<li>MOE = margin of error</li>
</ul>
<p>I wanted my results to be super accurate, so chose a very high confidence interval of 99.9% (a z-score of 3.291), and kept the standard margin of error of 5%. For the sample proportion I chose 50% as that gives the largest sample size needed. </p>
<p>Using these numbers, the sample size needed was 1072. Square rooting that gave me a canvas size of about 32px x 32px. </p>

<h4><a name="determining-percent-difference" class="heading-link" href="#determining-percent-difference">Determining Percent Difference</a></h4>
<p>Now that I knew what canvas size to use, I needed to know what percent change was needed to detect an icon. I wrote a script to find every icon on the Ligature Symbols webpage and calculate the percent difference from the first character to the whole word.</p>
<pre tabindex="0"><code class="language-js">const canvas = document.createElement(&#39;canvas&#39;);
const context = canvas.getContext(&#39;2d&#39;);
const fontFamily = &#39;LigatureSymbols&#39;;
const percents = [];

let fontSize = 36;  
let font = `${fontSize}px &quot;${fontFamily}&quot;`;

document.querySelectorAll(&#39;.lsf.symbol&#39;).forEach(node =&gt; {
  const word = node.textContent;
  if (!word) return;  // there was a symbol without text

  context.font = font;
  let width = context.measureText(word.charAt(0)).width

  // ensure the width of the first character is the required size
  // (36 pixels does not mean the font is draw that wide)
  if (width &lt; 33) {
    let ratio = 33 / width;
    width *= ratio;
    fontSize *= ratio;
    font = `${fontSize}px &quot;${fontFamily}&quot;`;
  }

  canvas.width = width;

  // the font size typically defines the height (including 
  // ascenders and descenders) of a font. this usually means we&#39;ll 
  // end up with a taller canvas than it is wide
  canvas.height = fontSize;

  // changing the size of the canvas resets all canvas properties, 
  // include font
  context.font = font;
  context.textAlign = &#39;left&#39;;
  context.textBaseline = &#39;top&#39;;

  // draw the first character and get the image data
  context.fillText(word.charAt(0), 0, 0);
  const firstCharData = new Uint32Array(
    context.getImageData(0, 0, width, fontSize).data.buffer
  );

  // draw the whole word and get the image data
  context.clearRect(0, 0, width, fontSize);
  context.fillText(word, 0, 0);
  const wholeWordData = new Uint32Array(
    context.getImageData(0, 0, width, fontSize).data.buffer
  );

  // we only want to know when a pixel has changed so can ignore 
  // the value at the pixel and only look to see if they were both
  // turned on or off
  const difference = firstCharData.reduce((diff, pixel, i) =&gt; {
    if (pixel === 0 &amp;&amp; wholeWordData[i] === 0) return diff;
    if (pixel !== 0 &amp;&amp; wholeWordData[i] !== 0) return diff;
    return ++diff;
  }, 0);

  percent = (difference / firstCharData.length).toFixed(2);
  percents.push(percent);
});

console.log(percents.sort().join(&#39;, &#39;));
</code></pre>
<p>The resulting data showed that the minimum difference was 17%. Running the same code for <a href="https://symbolset.com/icons/geomicons-squared">Symbolset Geomicons Squared</a> resulted in a minimum difference of 26%. This informed me that all ligature icons could be caught by using a difference threshold of about 15%.</p>
<p>All that was left to do was ensure that a normal text ligature wouldn&#39;t be flagged as an icon. I ran the same test on a few Google Fonts that had text ligatures and they showed that the fi ligature is about a 5% difference, which was perfect.</p>

<h3><a name="caveats" class="heading-link" href="#caveats">Caveats</a></h3>
<p>Even though this approach works for the 3 sets of ligature icon fonts I tested, I would need to test it against a larger sample size to ensure my results are accurate. Unfortunately I couldn&#39;t find very many fonts that use ligature icons. </p>
<p>This approach also does not work for single character ligature icons as there would be nothing to compare the original font to before it changed. </p>
<p>Lastly, in testing Material Icon I found that they don&#39;t have any character data for the standard alphabet. This resulted in differences as low as 4% (a blank canvas compared to a single line for &quot;minimize&quot;). I had to adjust the code to check to see if the first character image data was empty and if it was assume the font was a ligature icon font (thus skipping the comparison).</p>

<h2><a name="final-code" class="heading-link" href="#final-code">Final Code</a></h2>
<p>Putting it all together, we can determine when a string of text has been replaced with a ligature icon using the following code:</p>
<pre tabindex="0"><code class="language-js">(function() {
  const canvas = document.createElement(&#39;canvas&#39;);
  const context = canvas.getContext(&#39;2d&#39;);

  window.isLigatureIcon = function isLigatureIcon(node) {
    const word = node.textContent;
    if (!word) return false;

    let fontSize = 36;
    let fontFamily = window.getComputedStyle(node).getPropertyValue(&#39;font-family&#39;);
    let font = `${fontSize}px &quot;${fontFamily}&quot;`;

    context.font = font;
    let width = context.measureText(word.charAt(0)).width

    // ensure the width of the first character is the required size
    // (36 pixels does not mean the font is draw that wide)
    if (width &lt; 33) {
      let ratio = 33 / width;
      width *= ratio;
      fontSize *= ratio;
      font = `${fontSize}px &quot;${fontFamily}&quot;`;
    }

    canvas.width = width;

    // the font size typically defines the height (including 
    // ascenders and descenders) of a font. this usually means we&#39;ll 
    // end up with a taller canvas than it is wide
    canvas.height = fontSize;

    // changing the size of the canvas resets all canvas properties, 
    // include font
    context.font = font;
    context.textAlign = &#39;left&#39;;
    context.textBaseline = &#39;top&#39;;

    // draw the first character and get the image data
    context.fillText(word.charAt(0), 0, 0);
    const firstCharData = new Uint32Array(
      context.getImageData(0, 0, width, fontSize).data.buffer
    );

    // check to make sure there was data for the first character, 
    // if not it&#39;s assumed to be a ligature icon font
    if (!firstCharData.some(pixel =&gt; !!pixel)) return true;

    // draw the whole word and get the image data
    context.clearRect(0, 0, width, fontSize);
    context.fillText(word, 0, 0);
    const wholeWordData = new Uint32Array(
      context.getImageData(0, 0, width, fontSize).data.buffer
    );

    // we only want to know when a pixel has changed so can ignore 
    // the value at the pixel and only look to see if they were both
    // turned on or off
    const difference = firstCharData.reduce((diff, pixel, i) =&gt; {
      if (pixel === 0 &amp;&amp; wholeWordData[i] === 0) return diff;
      if (pixel !== 0 &amp;&amp; wholeWordData[i] !== 0) return diff;
      return ++diff;
    }, 0);

    return (difference / firstCharData.length).toFixed(2) &gt; 0.15;
  };
})();
</code></pre>
]]></content>
    </entry>
    <entry>
        <title type="html"><![CDATA[Unit Testing a Vue.js Functional Component that Returns Multiple Root Nodes]]></title>
        <id>https://stevenklambert.com/writing/unit-testing-vuejs-functional-component-multiple-root-nodes/</id>
        <link href="https://stevenklambert.com/writing/unit-testing-vuejs-functional-component-multiple-root-nodes/">
        </link>
        <updated>2019-02-10T00:00:00.000Z</updated>
        <summary type="html"><![CDATA[Unit testing a functional component with a render function that returns multiple root nodes is a bit tricky and isn't well documented. Lets explore how to do it.]]></summary>
        <content type="html"><![CDATA[<p>I&#39;ve been learning Vue.js recently by building a small app. Part of my app displays information using a table, so I extracted out the row into its own functional component using a <a href="https://vuejsdevelopers.com/2018/09/11/vue-multiple-root-fragments/">render function that returns multiple root nodes</a>. That worked great except when it came time to test the component.</p>
<pre tabindex="0"><code class="language-html">&lt;!-- Cell.vue --&gt;
&lt;script&gt;
export default {
  functional: true,
  props: [&#39;cellData&#39;],
  render: function (h, context) {
    return [
      h(&#39;td&#39;, context.props.cellData.category),
      h(&#39;td&#39;, context.props.cellData.description)
    ]
  }
}
&lt;/script&gt;
</code></pre>
<p>The first tricky part was that I discovered that you can&#39;t use <code>propsData</code> to pass props to a functional component. Instead you need to pass a <a href="https://vue-test-utils.vuejs.org/api/options.html#context">context object</a> that has a <code>props</code> property.</p>
<p>Next I tried to <code>shallowMount</code> the component as I typically do, but that resulted in a warning: </p>
<pre><code>[Vue warn]: Multiple root nodes returned from render function. Render function should return a single root node.
</code></pre><pre tabindex="0"><code class="language-js">// Cell.spec.js
import { shallowMount } from &#39;@vue/test-utils&#39;
import Cell from &#39;@/components/Cell&#39;

wrapper = shallowMount(Cell, {
  context: {
    props: {
      cellData {
        category: &#39;foo&#39;,
        description: &#39;bar&#39;
      }
    }
  }
}); // [Vue warn]: Multiple root nodes returned from render function. Render function should return a single root node.
</code></pre>
<p>I next tried wrapping the component in a single <code>&lt;div&gt;</code> to create a single root node. That didn&#39;t work either though as I got an error: </p>
<pre><code>[vue-test-utils]: mount.context can only be used when mounting a functional component.
</code></pre><pre tabindex="0"><code class="language-js">// Cell.spec.js
import { shallowMount } from &#39;@vue/test-utils&#39;
import Cell from &#39;@/components/Cell&#39;

wrapper = shallowMount(&#39;&lt;div&gt;&lt;Cell&gt;&lt;/div&gt;&#39;, {
  context: {
    props: {
      cellData {
        category: &#39;foo&#39;,
        description: &#39;bar&#39;
      }
    }
  }
}); // [vue-test-utils]: mount.context can only be used when mounting a functional component.
</code></pre>
<p>At this point I didn&#39;t know what to do so (as passing <code>propsData</code> didn&#39;t work either), so I turned to <a href="https://stackoverflow.com/questions/54239343/how-do-you-unit-test-a-vue-js-functional-component-with-a-render-function-that-r">StackOverflow and asked there</a>.</p>
<p>It turns out that you need to create a wrapper component that renders the functional component and forwards it all props and listeners. Then you can <code>mount</code> the wrapper component to be able to test the functional component.</p>
<pre tabindex="0"><code class="language-js">// Cell.spec.js
import { mount } from &#39;@vue/test-utils&#39;
import Cell from &#39;@/components/Cell&#39;

const WrappedCell = {
  components: { Cell },
  template: `
    &lt;div&gt;
      &lt;Cell v-bind=&quot;$attrs&quot; v-on=&quot;$listeners&quot; /&gt;
    &lt;/div&gt;
  `
}

const wrapper = mount(WrappedCell, {
  propsData: {
    cellData: {
      category: &#39;foo&#39;,
      description: &#39;bar&#39;
    }
  }
});

describe(&#39;Cell.vue&#39;, () =&gt; {
  it(&#39;should output two tds with category and description&#39;, () =&gt; {
    expect(wrapper.findAll(&#39;td&#39;)).toHaveLength(2);
    expect(wrapper.findAll(&#39;td&#39;).at(0).text()).toBe(&#39;foo&#39;);
    expect(wrapper.findAll(&#39;td&#39;).at(1).text()).toBe(&#39;bar&#39;);
  });
});
</code></pre>
<p>The last piece of the puzzle was figuring out how to test that a parent component that used the functional component passed it the correct props. Normally you would use <code>wrapper.props()</code> to test the props, but this doesn&#39;t work for a functional component as you get an error: </p>
<pre><code>[vue-test-utils]: wrapper.props() cannot be called on a mounted functional component.
</code></pre><p>Instead, what I figured out you can do is use a similar method as testing the functional component. When mounting a component, you can pass it a <a href="https://vue-test-utils.vuejs.org/api/options.html#stubs">stubs option</a> in which you can stub one component out for another. This allows us to create a wrapper component and stub it for the functional component. </p>
<p>Since the wrapper component isn&#39;t functional, you can call <code>props()</code> on it to test that we&#39;re passing it the correct data. The wrapper component doesn&#39;t need to render the functional component or even register it as a <code>component</code>. The only requirement is that it declares the same <code>props</code> as the functional component. </p>
<pre tabindex="0"><code class="language-js">// ParentCell.spec.js
import { shallowMount } from &#39;@vue/test-utils&#39;
import ParentCell from &#39;@/components/ParentCell&#39;

const Cell = {
  props: [&#39;cellData&#39;],
  template: &#39;&lt;div&gt;&lt;/div&gt;&#39;
}

describe(&#39;ParentCell.vue&#39;, () =&gt; {

  let wrapper;
  beforeEach(() =&gt; {
    wrapper = shallowMount(ParentCell, {
      stubs: {
        Cell: Cell
      }
    });
  });

  it(&#39;should correctly render the cell&#39;, () =&gt; {
    expect(wrapper.find(Cell).exists()).toBe(true);
    expect(wrapper.find(Cell).props(&#39;cellData&#39;)).toEqual({
      category: &#39;foo&#39;,
      description: &#39;bar&#39;
    });
  });
});
</code></pre>
]]></content>
    </entry>
    <entry>
        <title type="html"><![CDATA[Tiled AutoMap Auto-Generate Walls]]></title>
        <id>https://stevenklambert.com/writing/tiled-automap-auto-generate-walls/</id>
        <link href="https://stevenklambert.com/writing/tiled-automap-auto-generate-walls/">
        </link>
        <updated>2018-12-30T00:00:00.000Z</updated>
        <summary type="html"><![CDATA[The Tiled AutoMap feature is a fantastic feature, but a recent change broke all Tiled AutoMap examples and tutorials made prior to 2018. Using the `StrictEmpty` flag will make the examples work again.]]></summary>
        <content type="html"><![CDATA[<p>I recently discovered the Tiled AutoMap feature and was excited to learn how to auto-generate walls based off the ground tiles. This feature is shown in the <a href="https://doc.mapeditor.org/en/stable/manual/automapping/#an-alternating-wall">examples of the Tiled AutoMap docs</a> and in a few popular videos about <a href="https://www.youtube.com/watch?v=pwYeLHAqi9k">auto cave</a> and <a href="https://www.youtube.com/watch?v=aQd3pDHhm3c">dungeon walls</a> generation. </p>
<p>However, these examples showed it working in a way that I could never get working. </p>
<p>The basic setup that each of the examples gave was to create a Tiled map and add a layer called <code>Ground</code> which contains ground tiles in the shape you wanted.</p>
<figure>
    <img class="lazyload" data-src="/images/tiled-map.png" alt="Tiled map editor with a 4x4 grid of ground tiles" width="383" height="444">
    <noscript>
        <img src="/images/tiled-map.png" alt="Tiled map editor with a 4x4 grid of ground tiles" width="383" height="444"/>
    </noscript>
    <figcaption>Tileset image courtesy of <a href="https://www.kenney.nl/assets/sokoban">Kenney</a></figcaption>
</figure>

<p>Next, you create another Tiled map (I called it <code>wall-rules.tmx</code>) in the same directory and create three layers: <code>regions</code>, <code>input_Ground</code>, and <code>output_Walls</code>. Using these layers, you create a rule to add a single wall above a single ground tile.</p>
<style>
table {
    width: 100%;
    text-align: center;
    border: 1px solid #646464;
    border-collapse: collapse;
}
th {
    background: lightgrey;
}
tr {
    border-top: 1px solid #646464;
}
td:first-child {
    border-right: 1px solid #646464;
}
td img {
    width: 150px;
    margin: 0 auto;
}

/* dark theme */
table,
th,
td:first-child {
    border-color: #a4a4a4;
}
th {
    color: #222;
    background: #a4a4a4;
}
</style>
<table>
    <caption>AutoMap Rule Layers</caption>
    <thead>
        <tr>
            <th width="66%">Tile layer</th>
            <th width="33%">Name</th>
        </tr>
    </thead>
    <tbody>
        <tr>
            <td>
                <img class="lazyload" data-src="/images/rule-region.png" alt="Tiled map editor with a 1x2 grid of tiles to represent the rule region" width="193" height="257"/>
                <noscript>
                    <img src="/images/rule-region.png" alt="Tiled map editor with a 1x2 grid of tiles to represent the rule region" width="193" height="257">
                </noscript>
            </td>
            <td>regions</td>
        </tr>
        <tr>
            <td>
                <img class="lazyload" data-src="/images/rule-input.png" alt="Tiled map editor showing the bottom grid as a ground tile" width="193" height="257"/>
                <noscript>
                    <img src="/images/rule-input.png" alt="Tiled map editor showing the bottom grid as a ground tile" width="193" height="257"/>
                </noscript>
            </td>
            <td>input_Ground</td>
        </tr>
        <tr>
            <td>
                <img class="lazyload" data-src="/images/rule-output.png" alt="Tiled map editor showing the top grid as a wall tile" width="193" height="257"/>
                <noscript>
                    <img src="/images/rule-output.png" alt="Tiled map editor showing the top grid as a wall tile" width="193" height="257"/>
                </noscript>
            </td>
            <td>output_Walls</td>
        </tr>
    </tbody>
</table>

<p>Lastly you create a <code>rules.txt</code> file in the same directory as the Tiled map that lists each rule map you want to include.</p>
<pre tabindex="0"><code class="language-text">wall-rules.tmx
</code></pre>
<p>With that, every example showed you should be able to run the AutoMap feature and it would populate the walls above the top row of ground tiles. This is the part that never worked.</p>
<p>It turns out that at the end of 2017 a <a href="https://github.com/bjorn/tiled/commit/eb1e85044f309d1cd9132a15baf7eaab1be6d4a5">new feature was added</a> that prevents these examples from working as is. The new feature added a flag to input layers called <code>StrictEmpty</code> that changed the default behavior to not match empty tiles:</p>
<blockquote>
<p>In &quot;StrictEmpty&quot; mode, empty tiles in the input region match empty tiles
in the set layer. So when an &quot;input&quot; layer contains an empty tile within
the input region, this means an empty tile is allowed at that location.
And when an &quot;inputnot&quot; layer contains an empty tile within the input
region, it means an empty tile is not allowed at that location.</p>
<p>Without the &quot;StrictEmpty&quot; option, when no &quot;input&quot; layer specifies any
tile for a given location, and no &quot;inputnot&quot; layers exist, any tile that
isn&#39;t used elsewhere on any input layer is considered valid. Also, when
an &quot;inputnot&quot; layer contains an empty tile, it is simply ignored. This
behavior can be convenient, but it is not always desired.</p>
<p>The &quot;StrictEmpty&quot; mode can be enabled per input layer by adding a custom
boolean property named &quot;StrictEmpty&quot; with the value &quot;true&quot;.</p>
</blockquote>
<p>So to get the examples to work, what you have to do is add a Layer Property to the <code>input_Ground</code> layer called <code>StrictEmpty</code> of type Bool and set the value to <code>true</code>.</p>
<p>Once you do that, the AutoMap feature will now work.</p>
<img src="/images/tiled-map-with-walls.png" alt="Tiled map editor with a 4x4 grid of ground tiles and a 4x1 row of wall tiles above the first row of ground tiles" width="383" height="444"/>

<p>You can <a href="https://github.com/straker/tiled-automap-example">download the complete example files</a> from github so you can try it out yourself.</p>
]]></content>
    </entry>
    <entry>
        <title type="html"><![CDATA[Using Fetch to Read JSON with Text Fallback]]></title>
        <id>https://stevenklambert.com/writing/fetch-json-text-fallback/</id>
        <link href="https://stevenklambert.com/writing/fetch-json-text-fallback/">
        </link>
        <updated>2018-08-16T00:00:00.000Z</updated>
        <summary type="html"><![CDATA[When using fetch, it can be helpful to be able to read data that could be either JSON or text and parse it as such. But how can we do so?]]></summary>
        <content type="html"><![CDATA[<p>Sometimes it&#39;s helpful to be able to read data that could be either JSON or text and parse it as such. </p>
<p>For example, all data in LocalStorage is saved as a string. This means saving the boolean <code>true</code> will be saved as the string <code>&quot;true&quot;</code>. A common pattern for reading from LocalStorage is to use <code>JSON.parse()</code> to parse the data on read. Since the parse could fail for non-JSON like data, we wrap the parse in a try/catch and fallback to the raw text value.</p>
<pre tabindex="0"><code class="language-js">let value = localStorage.getItem(key);
try {
  value = JSON.parse(value);
}
catch(e) {}
</code></pre>
<p>This pattern can also be helpful for when you need to make an HTTP request for data that could be JSON or text. But when trying to do this pattern using <code>fetch()</code>, I ran into some problems. </p>
<p>Typically when you read JSON from a fetch call, you use <code>response.json()</code> to return a promise which resolves with the parsed JSON.</p>
<pre tabindex="0"><code class="language-js">fetch(&#39;/file.json&#39;)
  .then(response =&gt; response.json())
  .then(data =&gt; {
    // data is now parsed JSON
  });
</code></pre>
<p>I figured that if the <code>response.json()</code> promise failed, I could try to parse the response as text using <code>response.text()</code>. However, doing so resulted in a <code>TypeError: body stream already read</code> error.</p>
<pre tabindex="0"><code class="language-js">fetch(&#39;/file&#39;)
  .then(response =&gt; 
    response.json().catch(() =&gt; response.text())
    // TypeError: body stream already read
  )
</code></pre>
<p>It turns out you can only read the response body once. Not knowing what to do, I turned to the internet. Thankfully, <a href="https://jakearchibald.com/2014/reading-responses/">Jake Archibald wrote an article</a> where he mentioned cloning the stream to be able to read it twice.</p>
<p>By using <code>response.clone()</code> we can create a copy of the response to parse as JSON, and if that fails we parse the original response as text.</p>
<pre tabindex="0"><code class="language-js">fetch(&#39;/file&#39;)
  .then(response =&gt; 
    response.clone().json().catch(() =&gt; response.text())
  ).then(data =&gt; {
    // data is now parsed JSON or raw text
  });
</code></pre>
]]></content>
    </entry>
    <entry>
        <title type="html"><![CDATA[Button vs Checkbox for a Toggle Control]]></title>
        <id>https://stevenklambert.com/writing/button-vs-checkbox-toggle/</id>
        <link href="https://stevenklambert.com/writing/button-vs-checkbox-toggle/">
        </link>
        <updated>2018-07-21T00:00:00.000Z</updated>
        <summary type="html"><![CDATA[When it comes to coding a toggle control, there is an important difference between using a button or a checkbox.]]></summary>
        <content type="html"><![CDATA[<p>Sometime ago I needed to implement a toggle control. I wanted to make it accessible, so I read Heydon Pickering&#39;s fantastic article <a href="https://inclusive-components.design/toggle-button/">Inclusive Toggle Buttons</a>. In the article, he gave examples of a notify by email toggle control using both a checkbox and a button. This got me thinking, what&#39;s the difference between a checkbox and a button for a toggle control? When would you use one over the other?</p>
<p>After scouring the internet, I was finally able to find a satisfactory explanation from the <a href="https://docs.microsoft.com/en-us/windows/uwp/design/controls-and-patterns/toggles">Microsoft UWP design docs</a>. </p>
<blockquote>
<ul>
<li>Use a toggle switch for binary settings when changes become effective immediately after the user changes them.</li>
<li>Use a checkbox when the user has to perform extra steps for changes to be effective. For example, if the user must click a &quot;submit&quot; or &quot;next&quot; button to apply changes, use a check box.</li>
</ul>
</blockquote>
<p>In other words, use a button for changes that should happen immediately and a checkbox for changes that should take place after the user submits them.</p>
<p>When I thought about it this way, these guidelines reminded me of the guidelines for when to use a button vs when to use a link. </p>
<p><em>Use a button to trigger interactions on the page and a link to navigate or retrieve information.</em></p>
<p>In both cases, a button is used to trigger an action. </p>
<p>To be sure my new findings would be inclusive, I asked the experts on the <a href="https://web-a11y.slack.com/archives/C042TSFGN/p1528407869000029">A11y Slack channel</a>. They confirmed that a checkbox would typically be used inside a form (where the user would submit it) and a button would perform an  action. </p>
<p>Going back to the notify by email toggle control example, it can be written as either a checkbox or a button. Depending on the context in which it is used will determine how it should be coded.</p>
]]></content>
    </entry>
</feed>